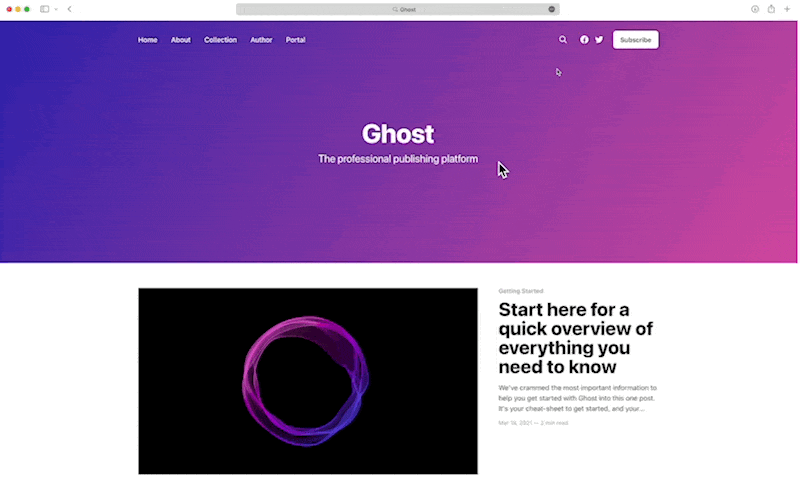
How to use search
Search is available on all Ghost sites, and there are various ways to activate the feature.
All of Ghost’s Official themes are
]]>How to use search
Search is available on all Ghost sites, and there are various ways to activate the feature.
All of Ghost’s Official themes are outfitted to support Search, and include a Ctrl/⌘ + K keyboard shortcut, to launch search within the browser. Find out how to update to the latest version of an official theme.
If your theme doesn’t support Search by default, this can be implemented in one of two ways (or both) depending on your preference.
Add search to your site navigation
The fastest way to get started is by adding a search link to your site navigation, in the Settings → Navigation area of Ghost Admin. All you need to do is add #/search as the URL and give it a name of your choosing.


Add search to custom themes
If you’re using a custom theme that doesn’t include support for search, it’s possible to add search using the data-ghost-search attribute on any element within your theme files. Read more in our developer docs.
If you’re using an unmodified version of the default theme, Casper, your theme will be automatically updated.
]]>If you’re using an unmodified version of the default theme, Casper, your theme will be automatically updated. If you’re using an unmodified version of any other official theme, update to the latest version using this guide.
From the Settings → Design page, click Change theme, and then click on the theme that you currently have installed:
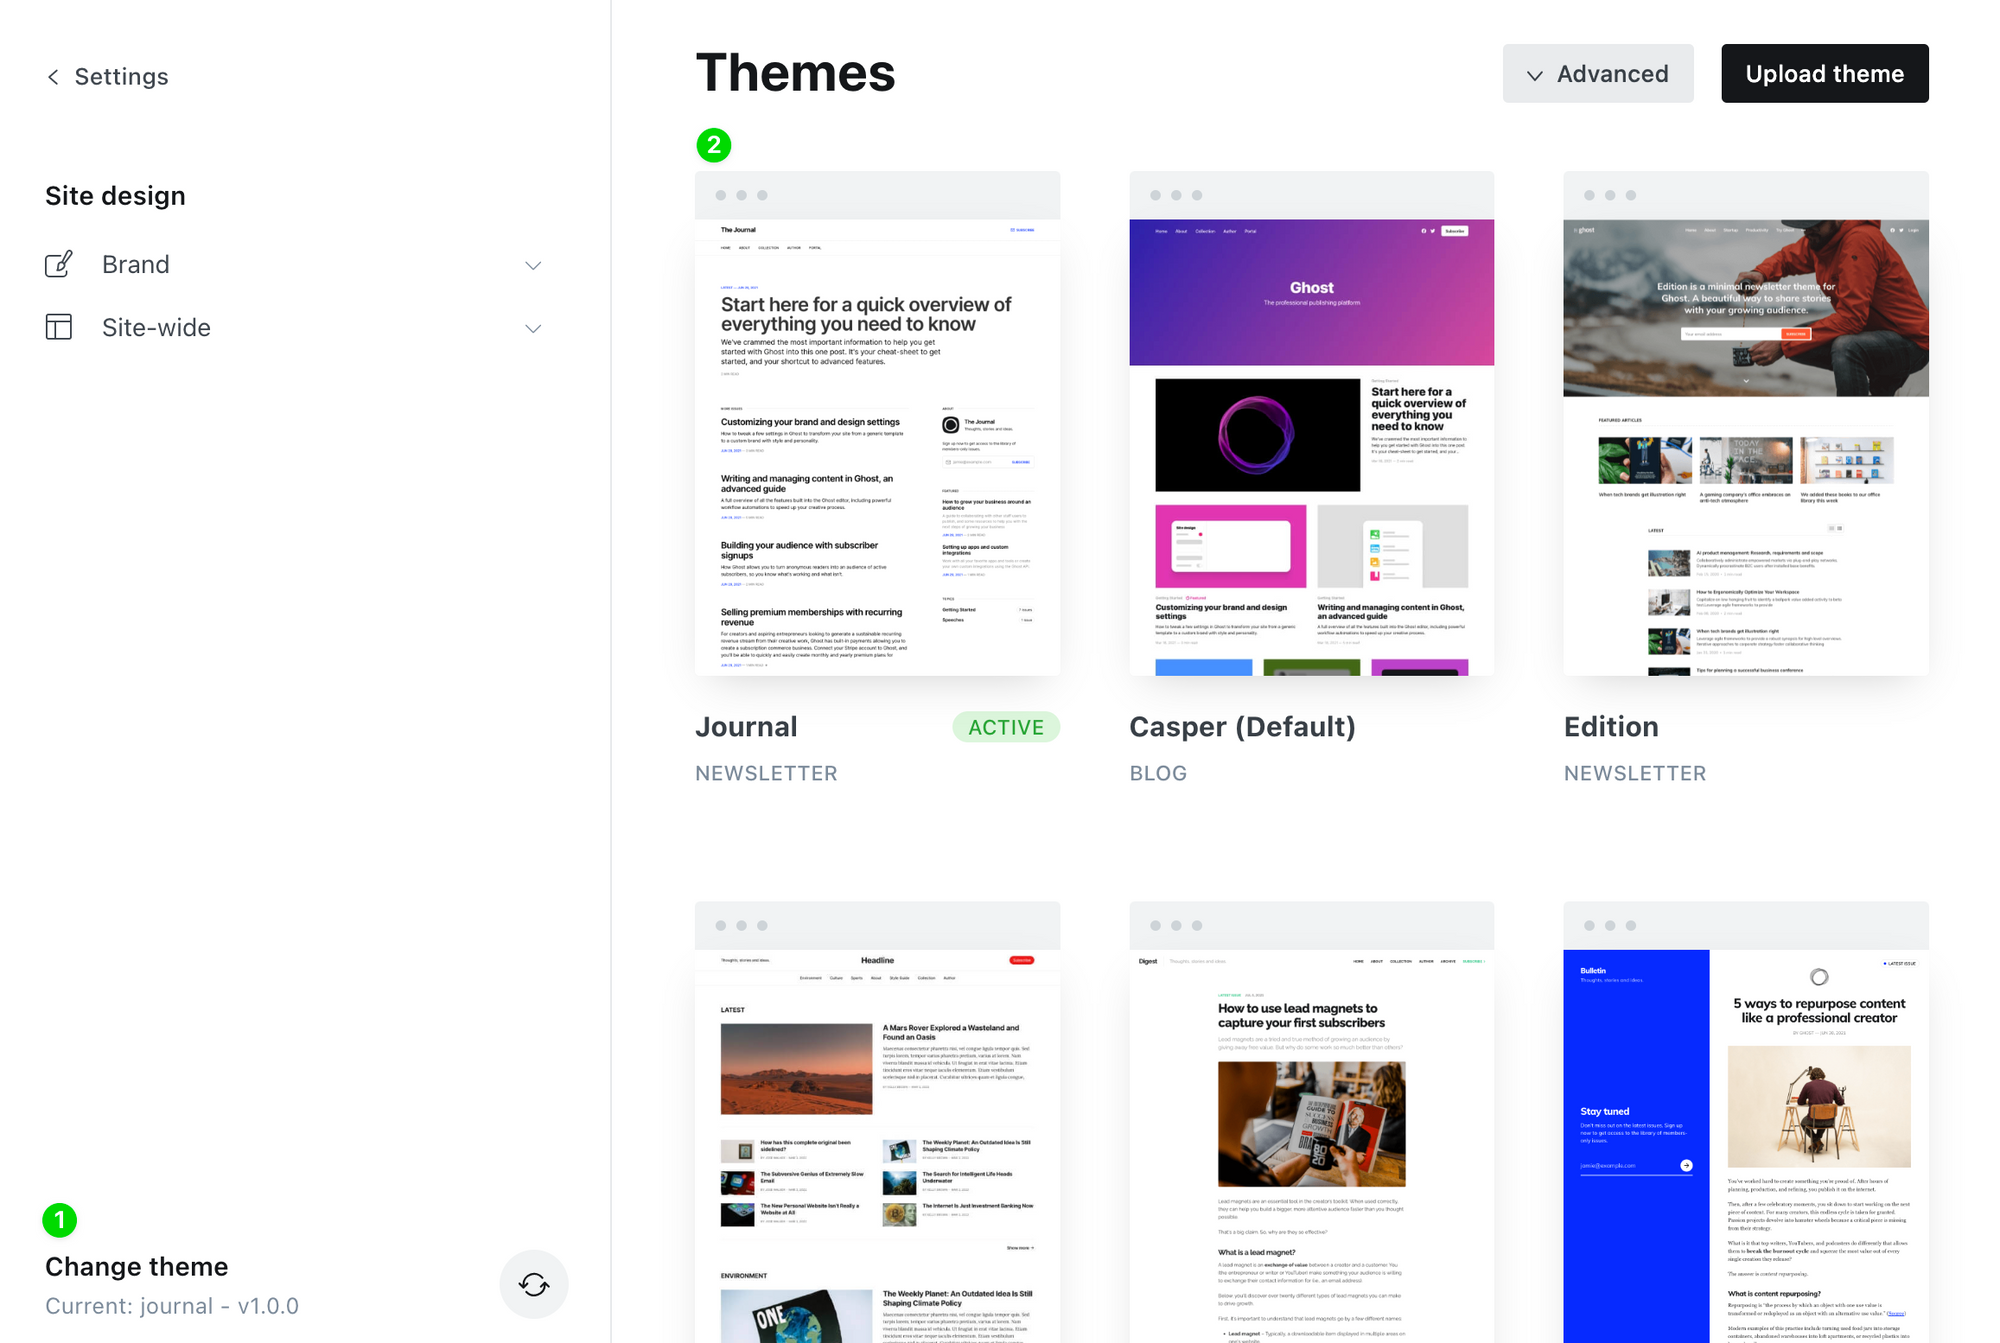
Then follow to steps to Use this theme, and overwrite the existing version with a new version of the same theme:
That’s it - you’re all done!
]]>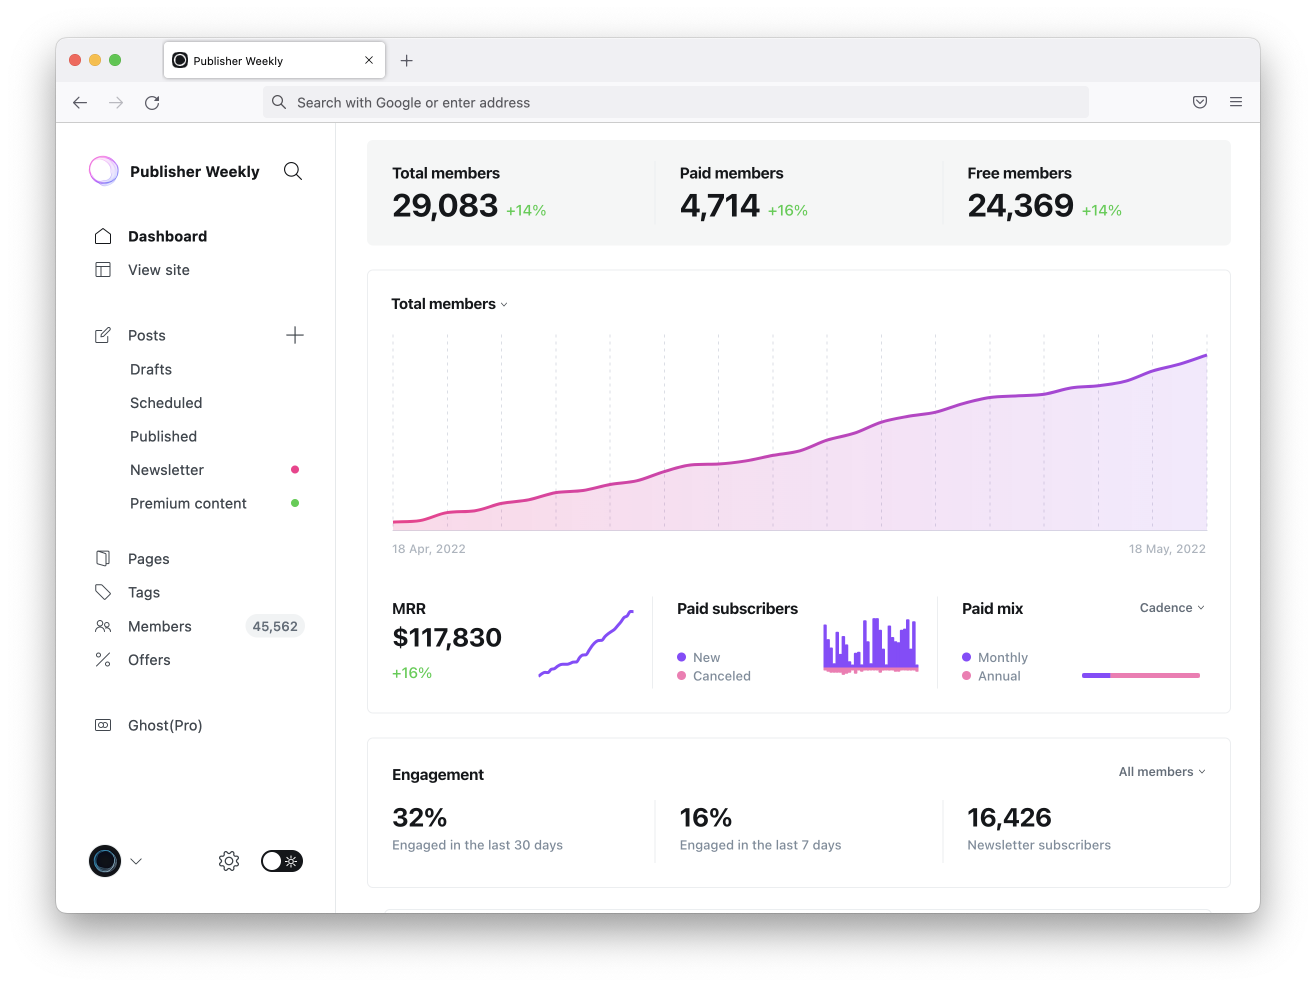
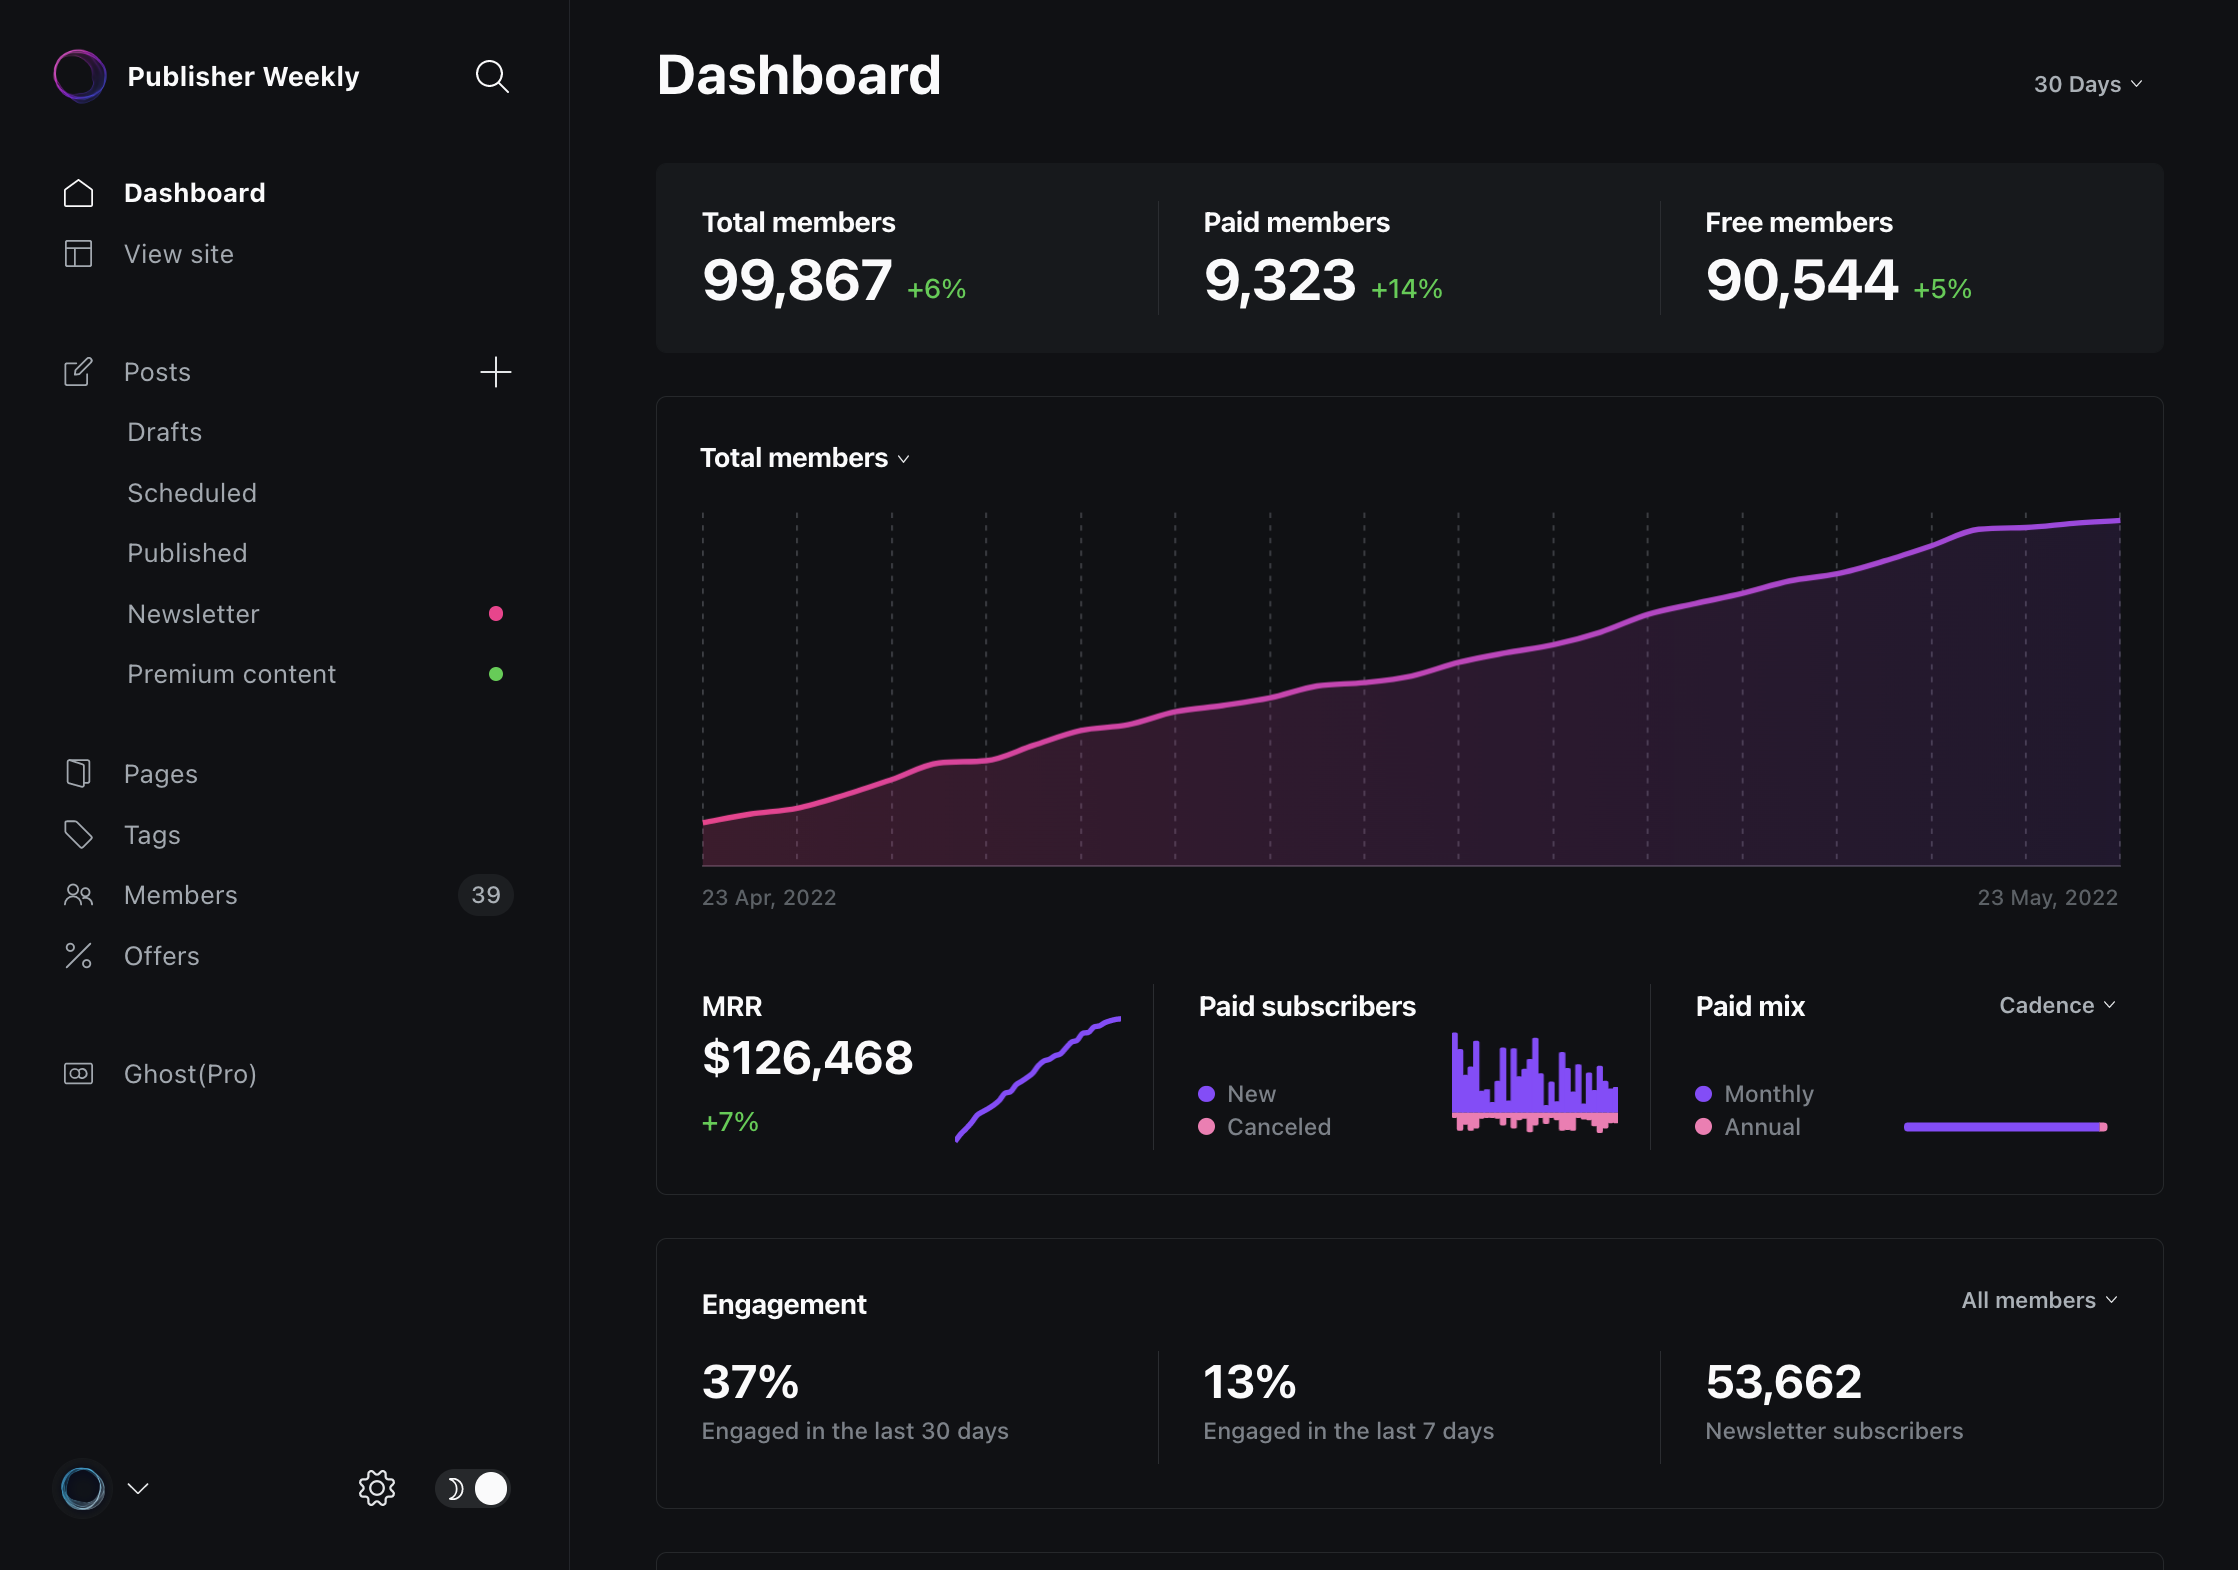
To help you better understand the stats provided on your dashboard, here’s a breakdown of everything you need to know.
Member totals
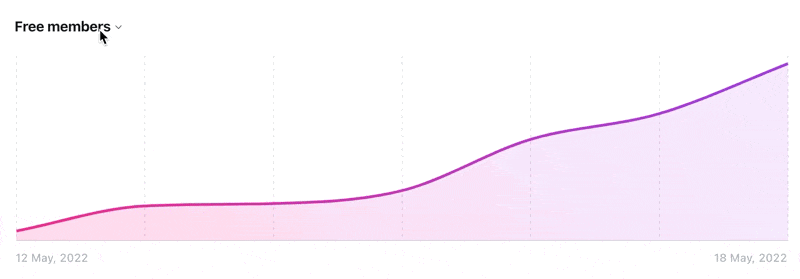
At the top of the dashboard you can see a breakdown of the types of members you have, split into three groups.
Here’s how each member segment is calculated:
- Total members includes all members of your site, free and paid.
- Paid Members includes all members on any paid or complimentary subscription. Canceled accounts are included until the end of the period paid for.
- Free members includes all members who do not have an active paid subscription, including members who have previously canceled and their billing period has ended.
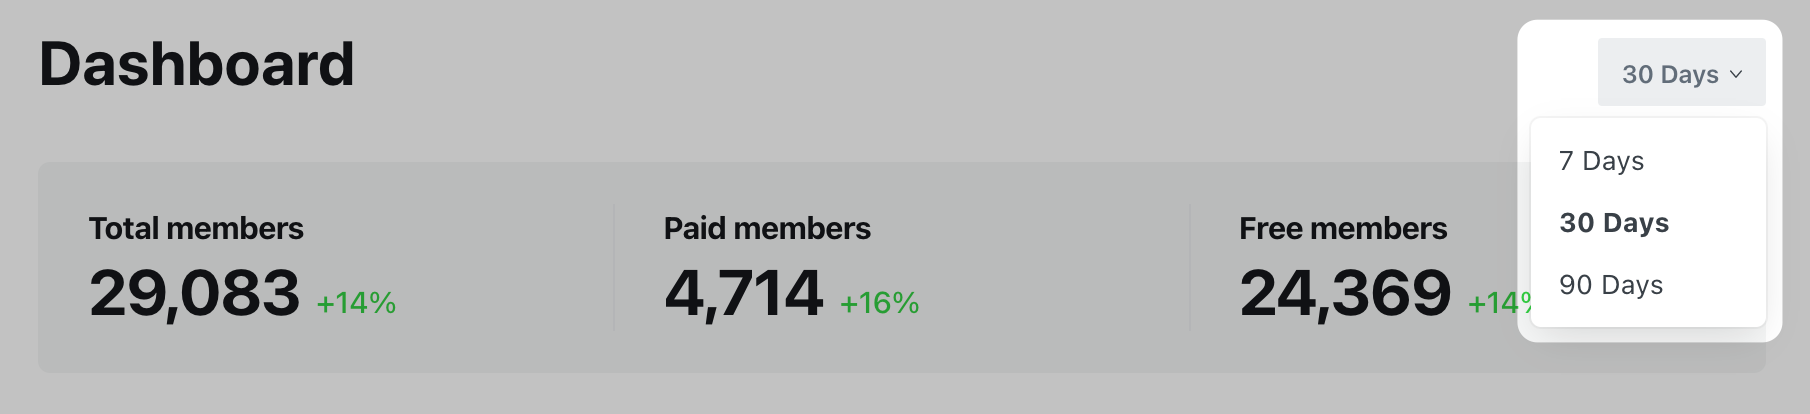
Each of these metrics shows an increase or decrease compared to the previous period set in the top right corner, to help you see how each segment of your members list is growing.
You can also see how these data trend over time, and adjust the graph to show total, paid, or free members.
MRR
Monthly Recurring Revenue (MRR) is a forward-looking metric that is calculated using the normalized amount of monthly recurring payments from all active subscriptions.
For example: An annual subscription for $120 counts as +$10 MRR ($120 / 12 months). A monthly subscription for $19 counts as +$19 MRR.
- Cancellations are removed from MRR calculations at the time a member cancels their subscription, thereby canceling the recurring payment.
- Subscriptions created with an offer with a duration of “forever” have the discount removed for MRR calculations. Temporary discounts are not considered when calculating MRR.
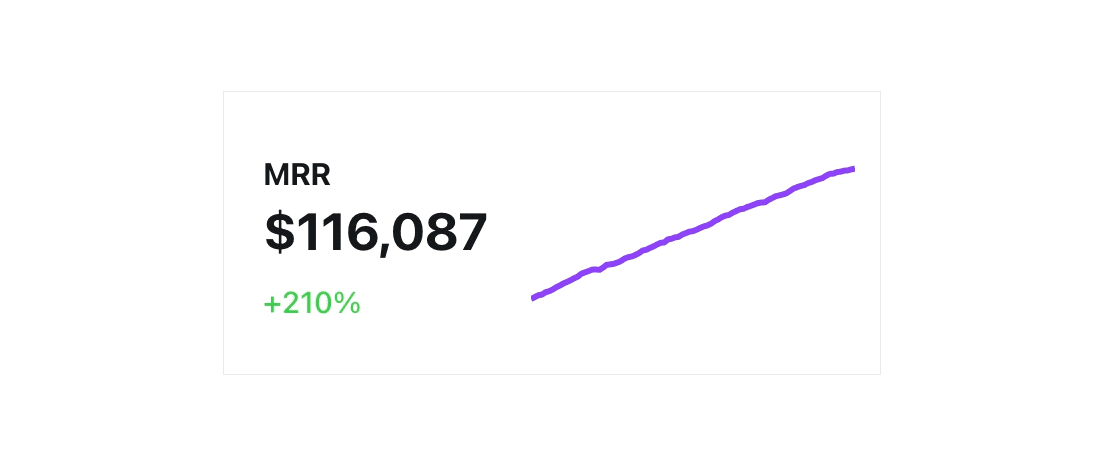
MRR is displayed as a figure, alongside a graph to show how MRR is trending over time. The percentage figure shows how your MRR has increased or decreased compared to the previous time period set on your dashboard.
Paid subscribers
New and canceled paid subscriptions for the currently selected time period are shown as a bar chart.
Paid mix
This shows the current ratio of paid subscriptions based on either cadence (annual or monthly) or tiers.
Engagement
The engagement section of the dashboard measures the percentage of members that have interacted with your content, whether that is opening an email or browsing content on your site, in the past 7 and 30 days.

If you’re using paid memberships in Ghost, you can break engagement down further by total, free, and paid members.
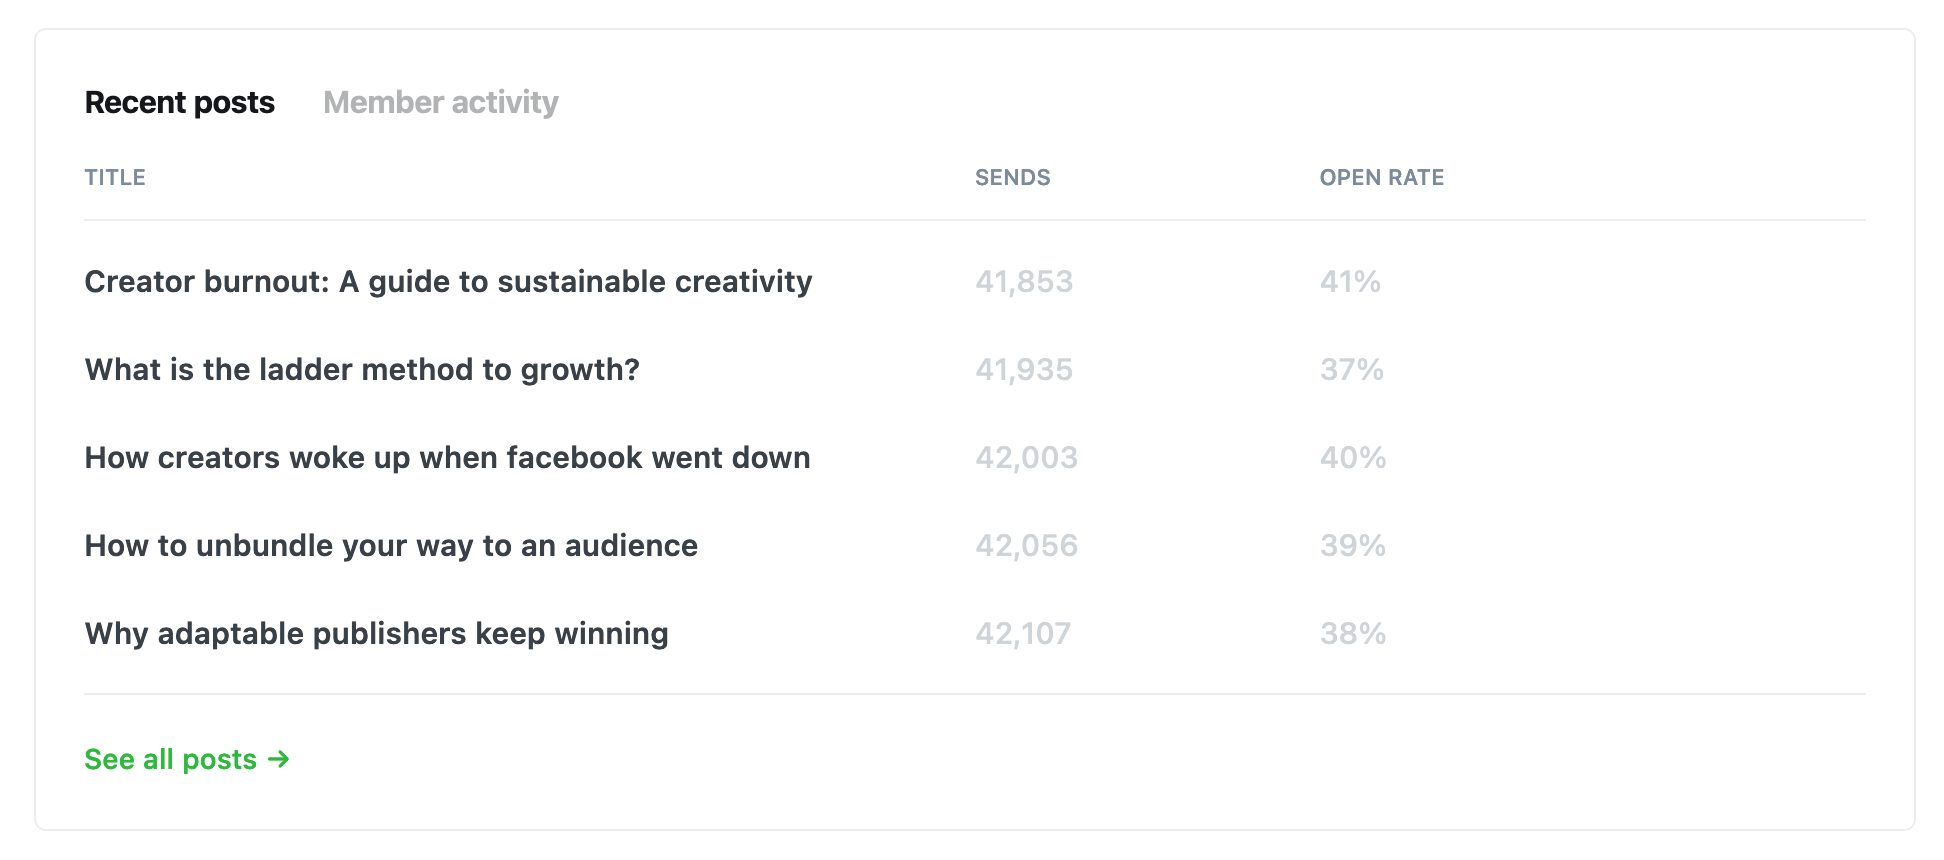
Recent posts and member activity
The recent posts and member activity section shows you the latest stats including open rates for the most recent newsletters, and recent member activity.
It also looks great in dark mode 🌶
Further reading
 David Ramos
Here are a few examples of how you might use multiple
]]>Here are a few examples of how you might use multiple newsletters:
- If you cover different topics in your content, your audience can decide which topics they’re most interested in.
- If you send daily newsletters and weekly roundups, your audience can decide when they’d like to hear from you.
- Give your audience the chance to subscribe to your newsletter and your podcast episode reminders, or just one.
Managing newsletters
To create and manage multiple newsletters in Ghost Admin, go to Settings → Email newsletter.
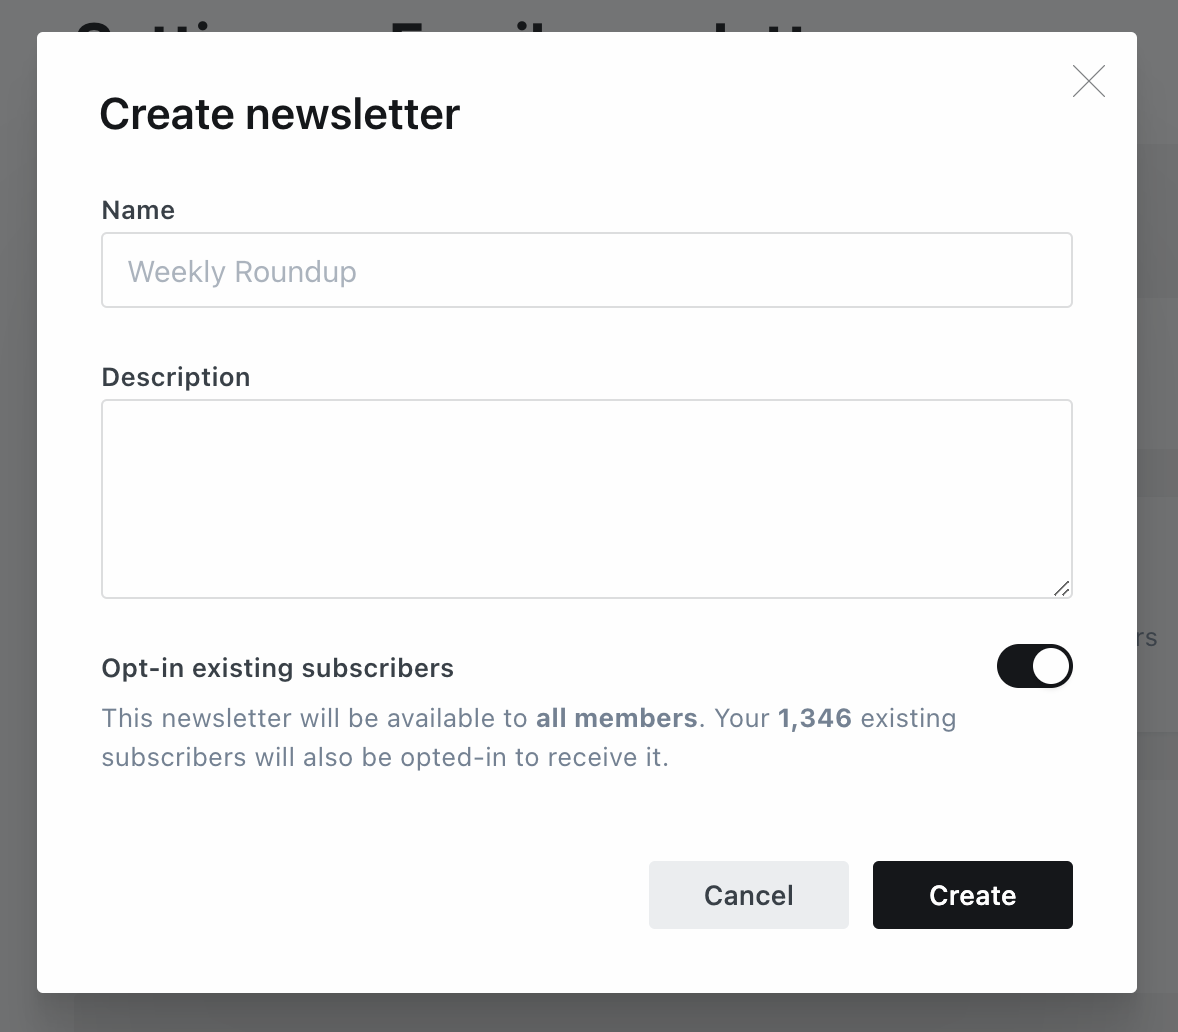
Add a newsletter
To add an additional newsletter, click + Add newsletter
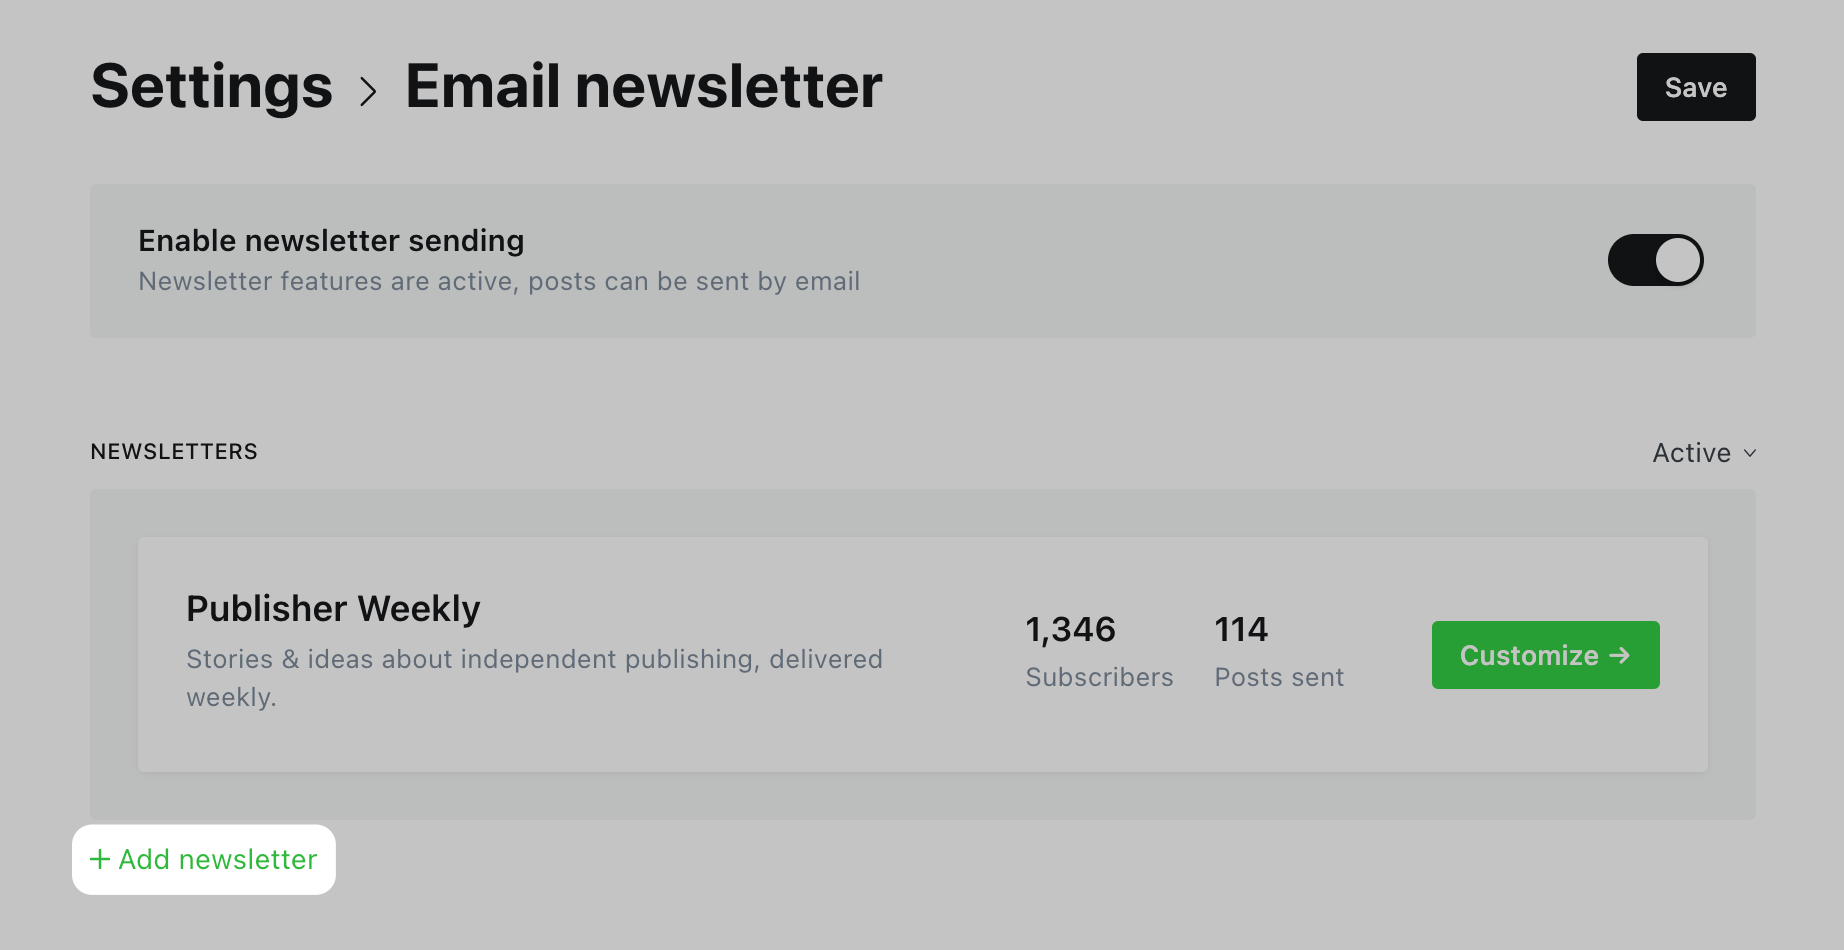
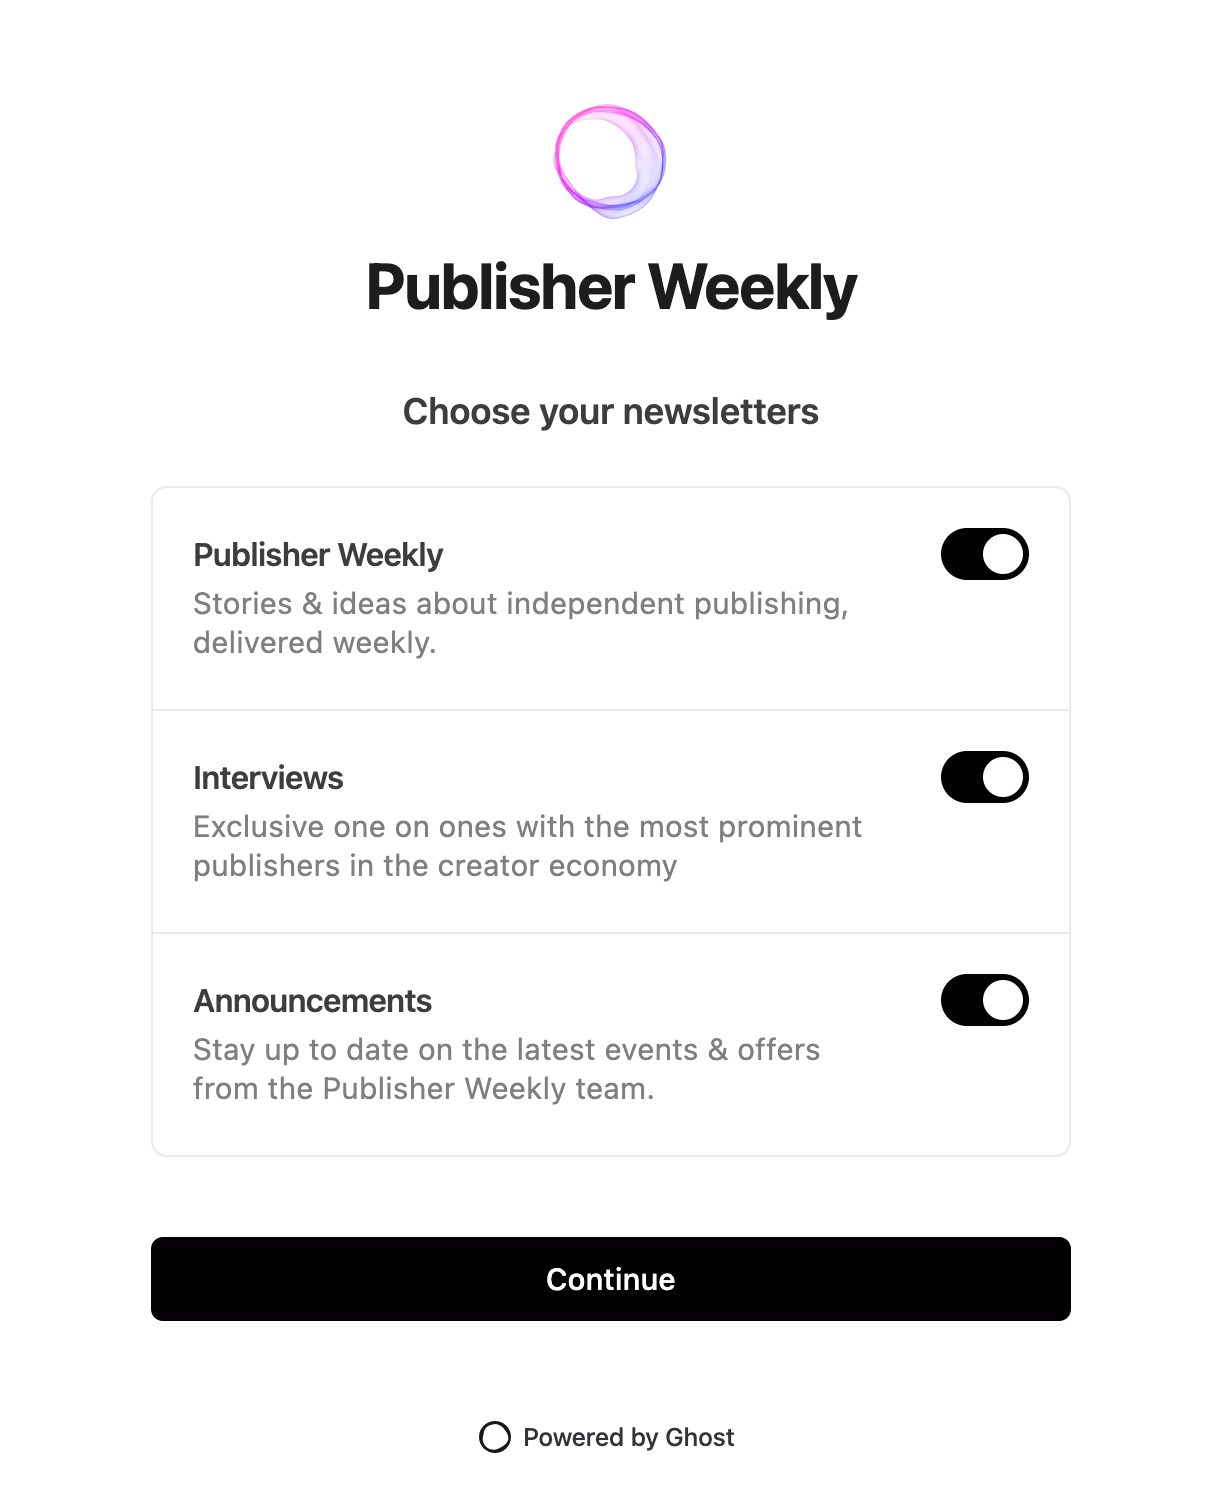
Each newsletter can have its own name and description, and Members can also automatically be opted-in (or out) to receive newsletters you create.
Once created, you’ll have additional options to customize your email newsletter design, and your newsletter will appear within Portal when new members signup, as well as when existing members manage their account preferences.
Archive a newsletter
Archiving newsletters allows you to make any newsletter you create unavailable to members.
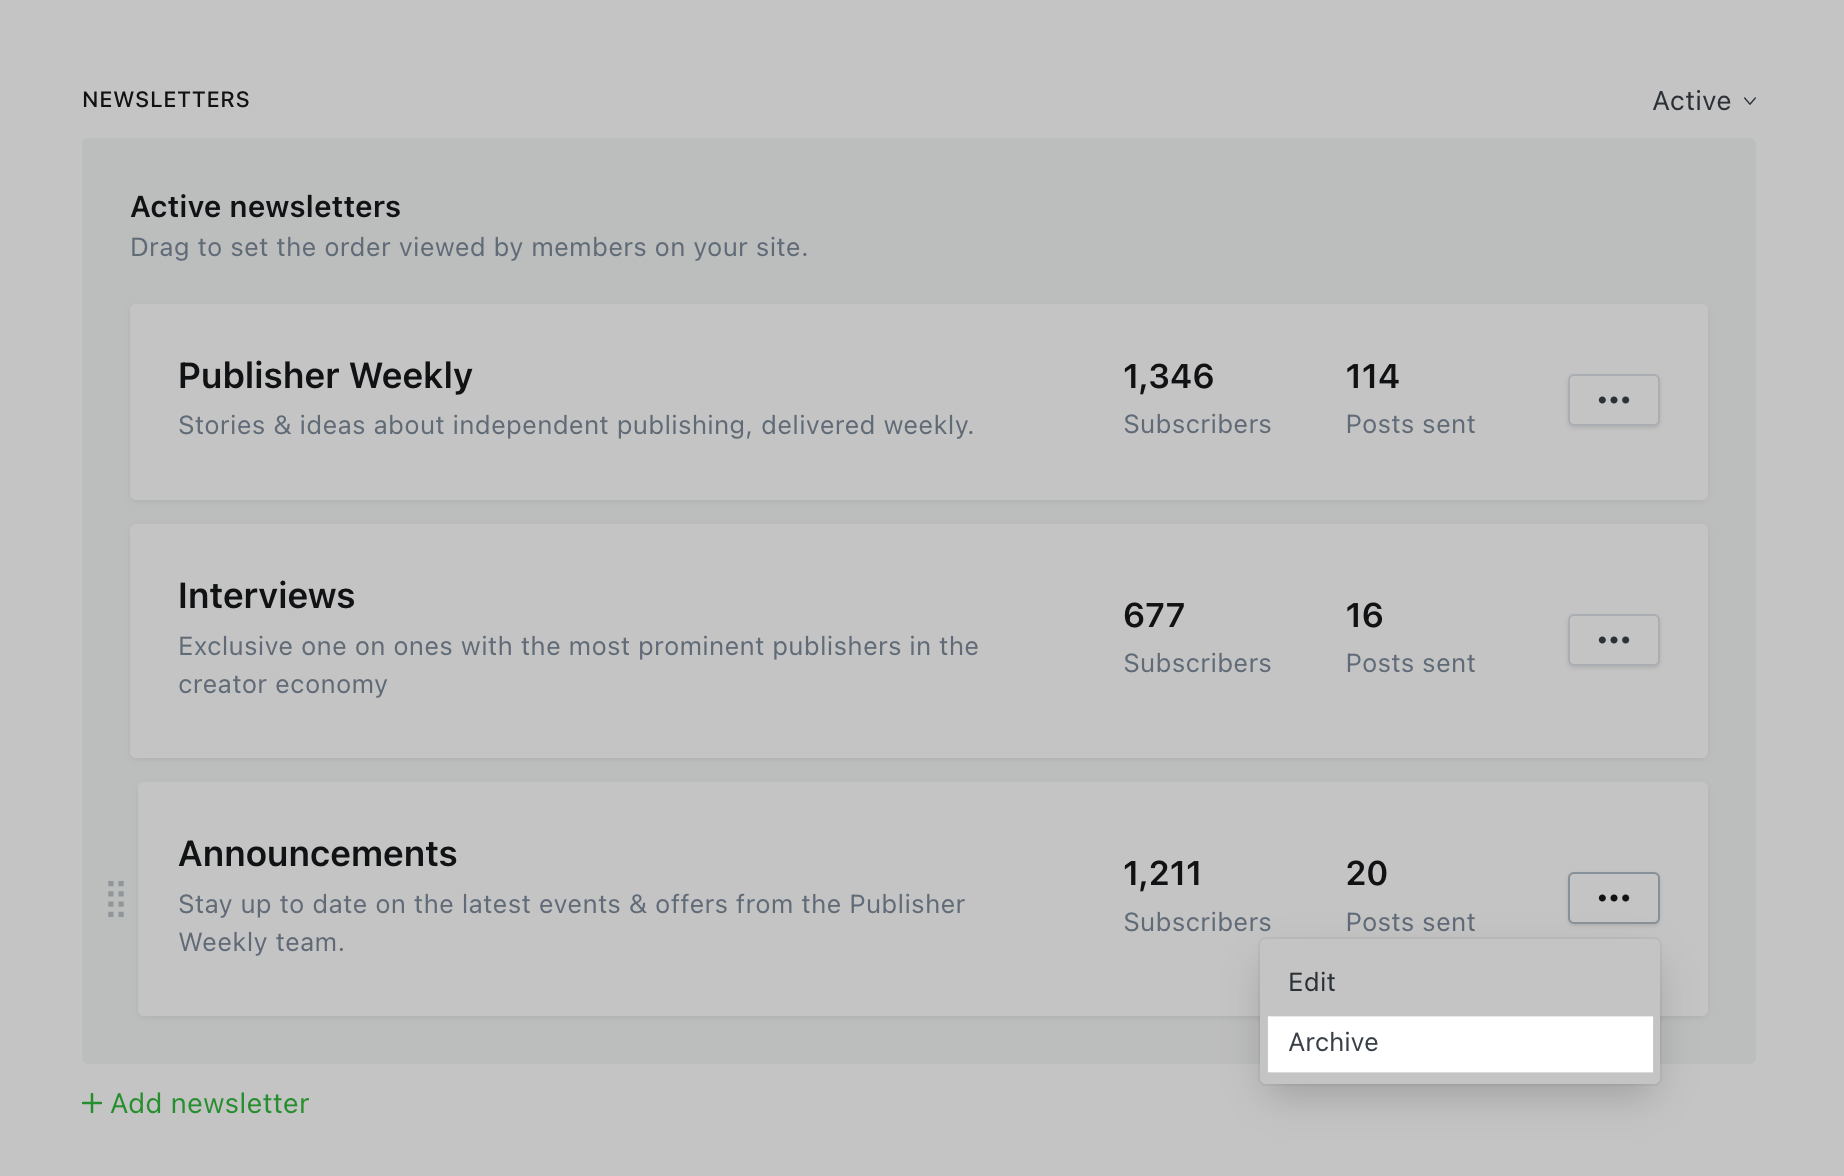
Once archived, the newsletter will also be unavailable as an option when publishing new posts.
]]>The email design settings in Ghost allow you to customize
]]>The email design settings in Ghost allow you to customize elements of the email template to suit your brand.
To get started, go to Settings → Email newsletter → Customize design to add a custom header image, show or hide your publication icon and title, as well as change your font preferences and add email footer text. When you update your newsletter design from the UI, you can preview them instantly before saving.
Genereal settings
The email newsletter general settings in Ghost allow you to customize how your newsletter is accessed within Ghost Admin, as well as configure custom email addresses used for sending.
Name & description
Setting a custom name and description for your newsletter makes it easier to identify from within the Settings → Email newsletter area in Ghost Admin. You can also choose to display the newsletter name within your email templates, for each newsletter associated with your publication.
Email addresses
Set a custom sender name, ‘from’ email address, and ‘reply-to’ email address for your newsletter. Read more on using a custom sender names.
Member settings
Enable or disable whether or not your newsletter should be automatically applied to new member signups to your publication. When enabled, members will automatically be subscribed.
Design settings
The email design settings in Ghost allow you to customize elements of the email template to suit your brand.
Header
Header image
Including a custom header image with your email newsletters is optional. To add a header image, click the upload icon and select your image. We recommend using a JPEG, PNG, GIF, or webp image that is 1200px by 600px for best results.
Publication title
Email newsletters can be configured to show or hide the publication title, which can be customized from the Settings → General area of Ghost Admin.
Newsletter name
When enabled, the newsletter name configured in your newsletter’s general settings will be displayed under the Publication Title, within your newsletter template.
Body
Newsletter title style
The title of your email newsletter includes the post title, author name, date and a link to view the newsletter as a webpage.
The header style options allow you to choose one of two text styles for the title of the newsletter:
- Clean, sans-serif
- Elegant, serif
By toggling the alignment icons, you can also change the entire header alignment to be left-justified or centered.
Body style
Body style allows you to set the tone of your newsletter by selecting one of two font styles for the email template’s main (body) text:
- Clean, sans-serif
- Elegant, serif
Feature image
If a feature image has been included with your post, you can enable the option to include this image with your email newsletters. This feature image will appear just below the header of your newsletter.
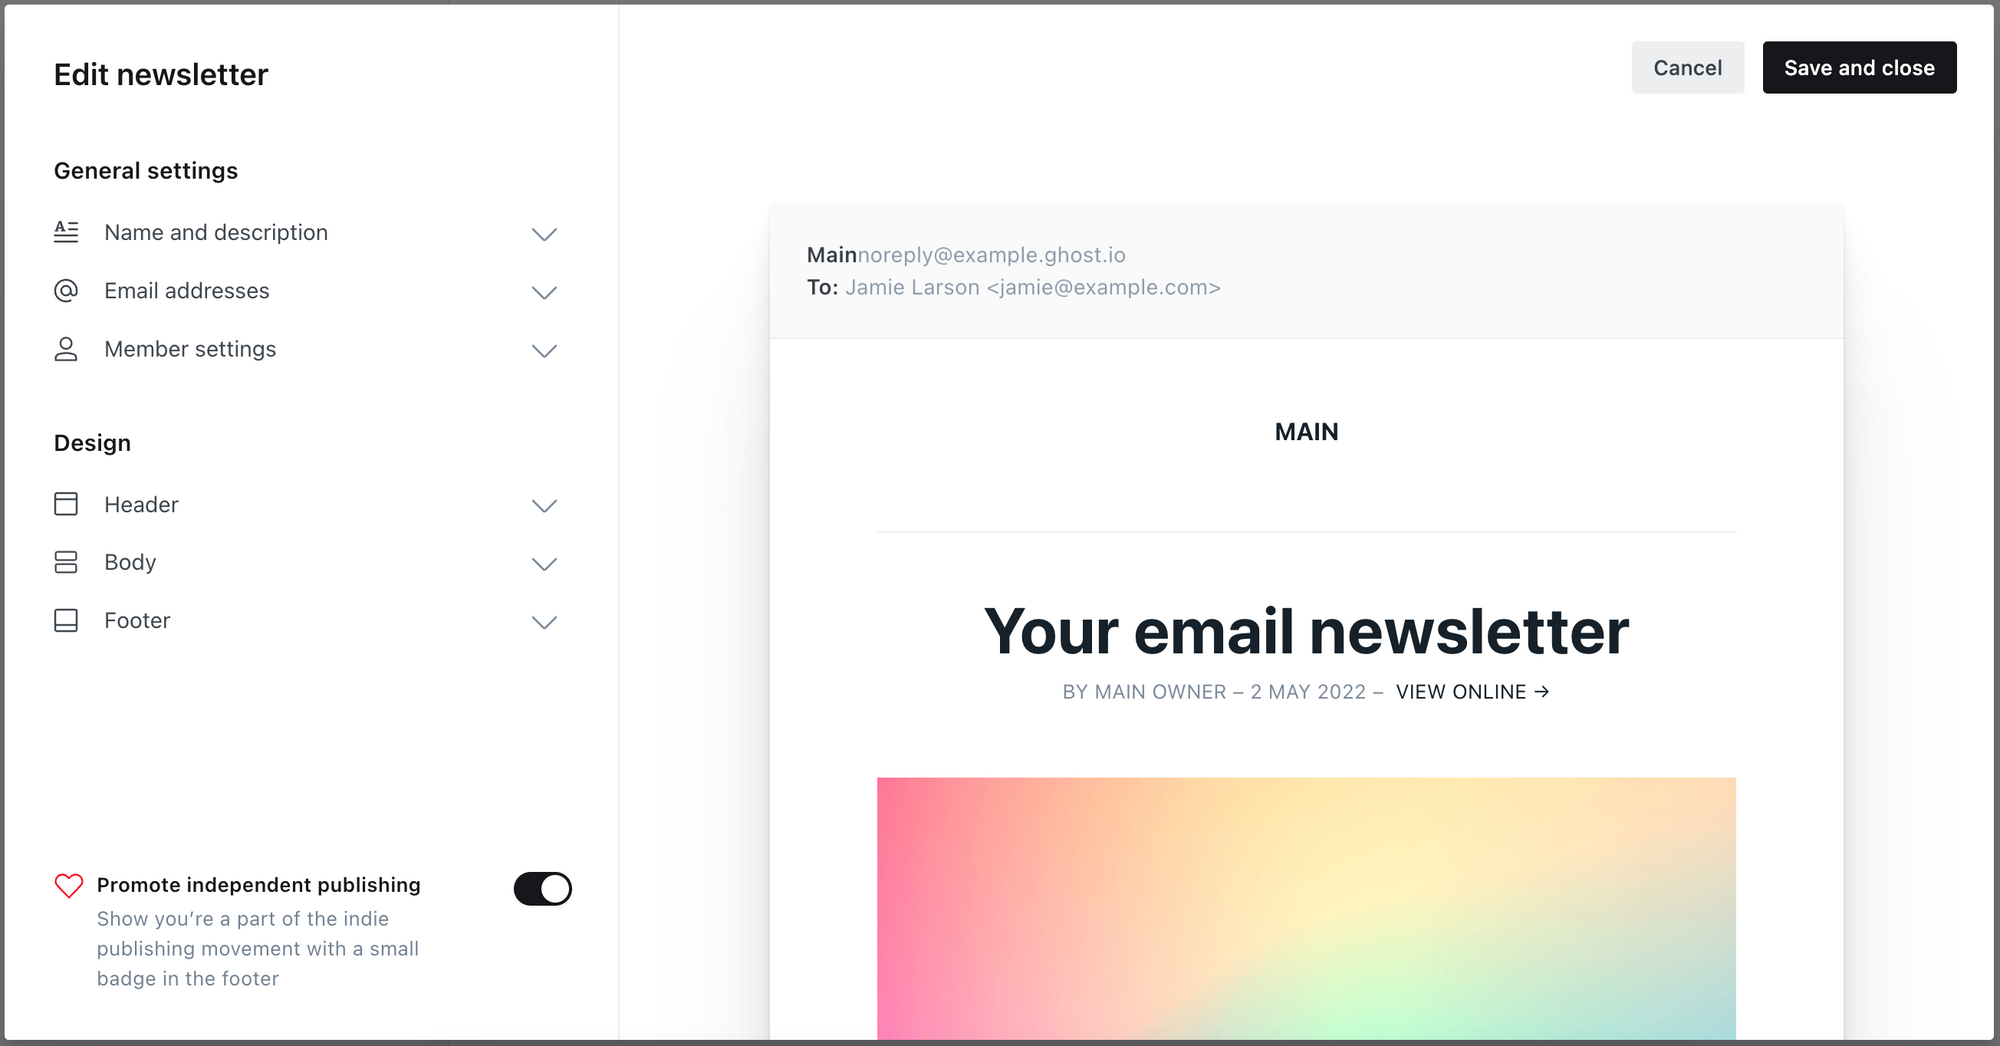
Footer
The email footer area can be customized to include any additional text or legal information you’d like to appear with each email newsletter.
Promote independent publishing
By default, all email newsletters include a “Published with Ghost” badge in the footer of the template. You can remove this badge by toggling the option to promote independent publishing off.
Saving your changes
When you’ve finished customizing the newsletter design options, save your changes by clicking the Save and close button in the top right corner of the design window. Once saved, your changes will be reflected in the next email newsletter you send to your members.
]]>.toml file to establish a subdirectory on Ghost(Pro).For this configuration to work successfully, you must be on a Business plan with a subdirectory enabled. You must also paste the exact configuration below into your
]]>.toml file to establish a subdirectory on Ghost(Pro).For this configuration to work successfully, you must be on a Business plan with a subdirectory enabled. You must also paste the exact configuration below into your netlify.toml file, updating the values to match your ghost.io subdomain and custom domain, so that it meets our reverse proxy rules.
Note: Ensure that your setup references the subdirectory path you are wanting to use (e.g. /blog/).
[[redirects]]
from = "/blog/*"
to = "https://<subdomain>.ghost.io/blog/:splat"
status = 200
force = true
headers = {X-Forwarded-Host = "<yourdomain.com>"}

[[redirects]]
from = "/blog"
to = "https://<subdomain>.ghost.io/blog/"
status = 200
force = true
headers = {X-Forwarded-Host = "<yourdomain.com>"}
For this configuration to work successfully, you must be on a Business plan with a subdirectory enabled. You must also paste the exact configuration below into the Worker script area, updating
]]>For this configuration to work successfully, you must be on a Business plan with a subdirectory enabled. You must also paste the exact configuration below into the Worker script area, updating each line as specified so that it meets our reverse proxy rules.
Use of Cloudflare Workers for a subdirectory setup is considered highly advanced and may require additional technical knowledge and troubleshooting. The below configuration has been tested and works with these exact settings if there are no conflicting top-level config issues.
Note: Ensure that your setup references the subdirectory path you are wanting to use (e.g. /^\\/blog/).
addEventListener('fetch', event => {
  event.respondWith(handleRequest(event.request))
})

/**
 * Respond to the request
 * @param {Request} request
 */
async function handleRequest(request) {
     try {

        const urlObject = new URL(request.url);

        // If the request is to the Ghost subdirectory
        if (/^\/blog/.test(urlObject.pathname)) {
          // Then Proxy to Ghost
          const GHOST_URL = "subdomain.ghost.io";
          const CUSTOM_URL = "customdomain.com";

          let url = new URL(request.url);

          url.hostname = GHOST_URL;

          let proxyRequest = new Request(url, request);

          proxyRequest.headers.set('Host', GHOST_URL);

          //Have an X-Forwarded-Host header that matches the custom domain in my.ghost.org.

          proxyRequest.headers.set("X-Forwarded-Host", CUSTOM_URL);

          //Include the X-Forwarded-Proto header set to https not http.

          proxyRequest.headers.set("X-Forwarded-Proto", "https");

          //Include the X-Forwarded-For header, populated with the remote IP of the original request.

          let ip = proxyRequest.headers.get("CF-Connecting-IP");

          proxyRequest.headers.set("X-Forwarded-For", ip);

          return await fetch(proxyRequest);

        }

     } catch (error) {

        // if no action found, play the regular request

        return await fetch(request);
    }

    return await fetch(request);
}- Free trial: 5mb
- Starter: 5mb
- Creator: 100mb
- Team: 250mb
- Business: 1gb
- Free trial: 5mb
- Starter: 5mb
- Creator: 100mb
- Team: 250mb
- Business: 1gb

Creating an offer
The offers page appears in Ghost Admin when you have an active Stripe connection in place.
Offers can be created for any plan or tier, using a percentage
]]>Creating an offer
The offers page appears in Ghost Admin when you have an active Stripe connection in place.
Offers can be created for any plan or tier, using a percentage or dollar discount amount. Discounts can be applied once, over multiple months, or forever.
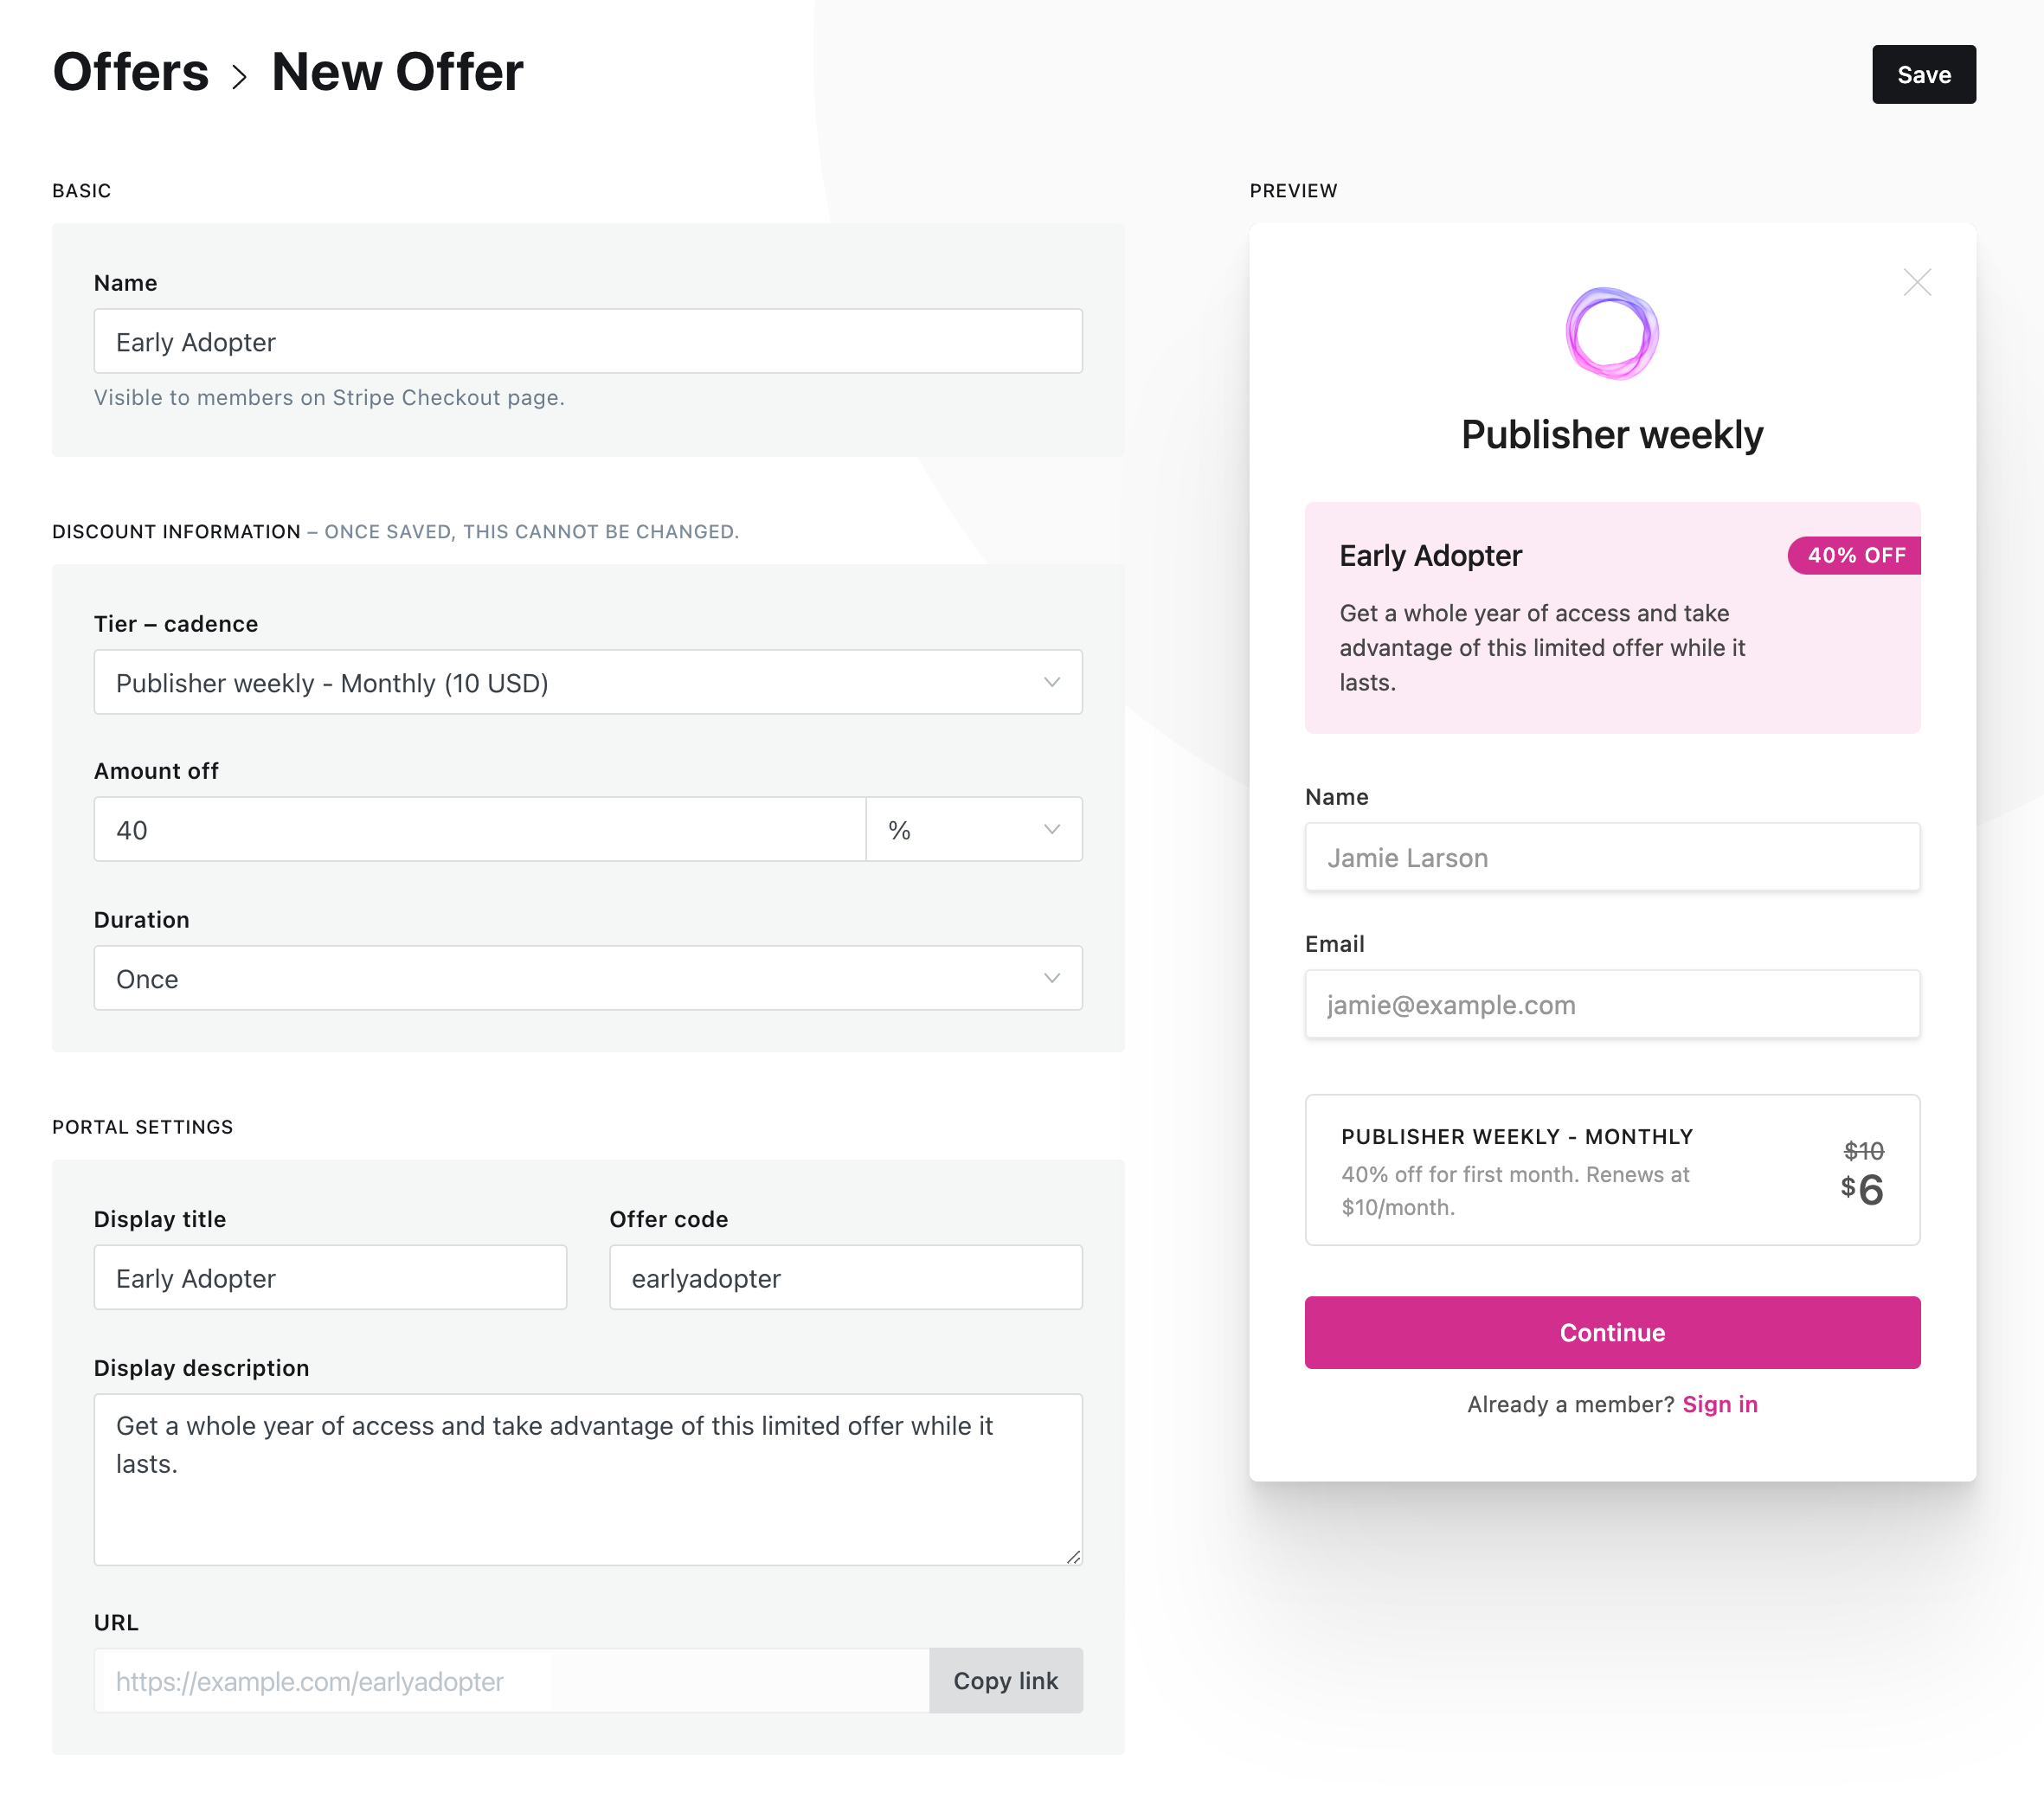
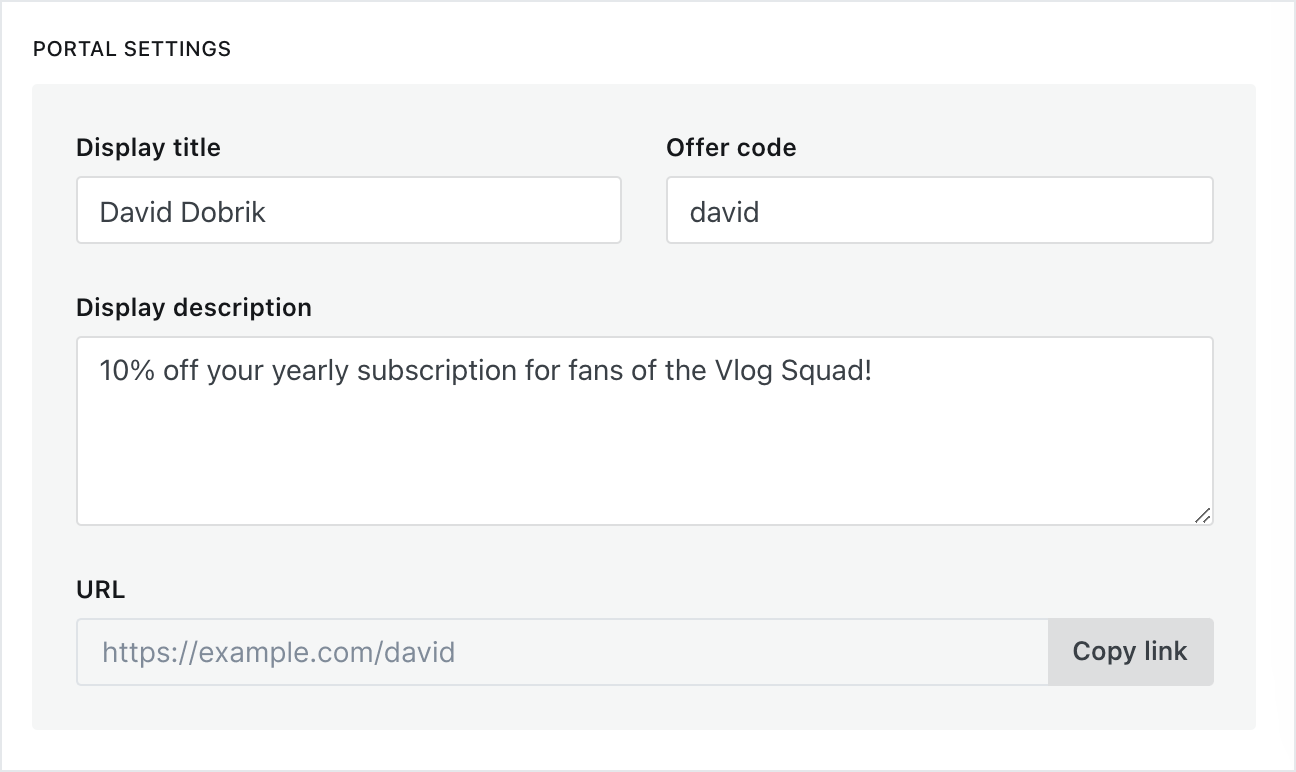
Each offer has customizable messaging, including a name, description, coupon and custom URL.
Sharing offers
Each offer has a custom URL which can be shared anywhere. When a visitor clicks an offer URL, they will land on your website with Portal displaying the offer.

It's possible to share your offer with your audience in lots of different ways:
- Include a link to your offer in a newsletter sent to your free audience, or a segment of your audience, using an email call to action card.
- Mention your offer link in a podcast episode
- Share your offer link on other platforms or social media
- Add an offer link to your homepage for a limited time
- Work with partners by creating custom offers for them to share with their audience, using an offer code with their first name.
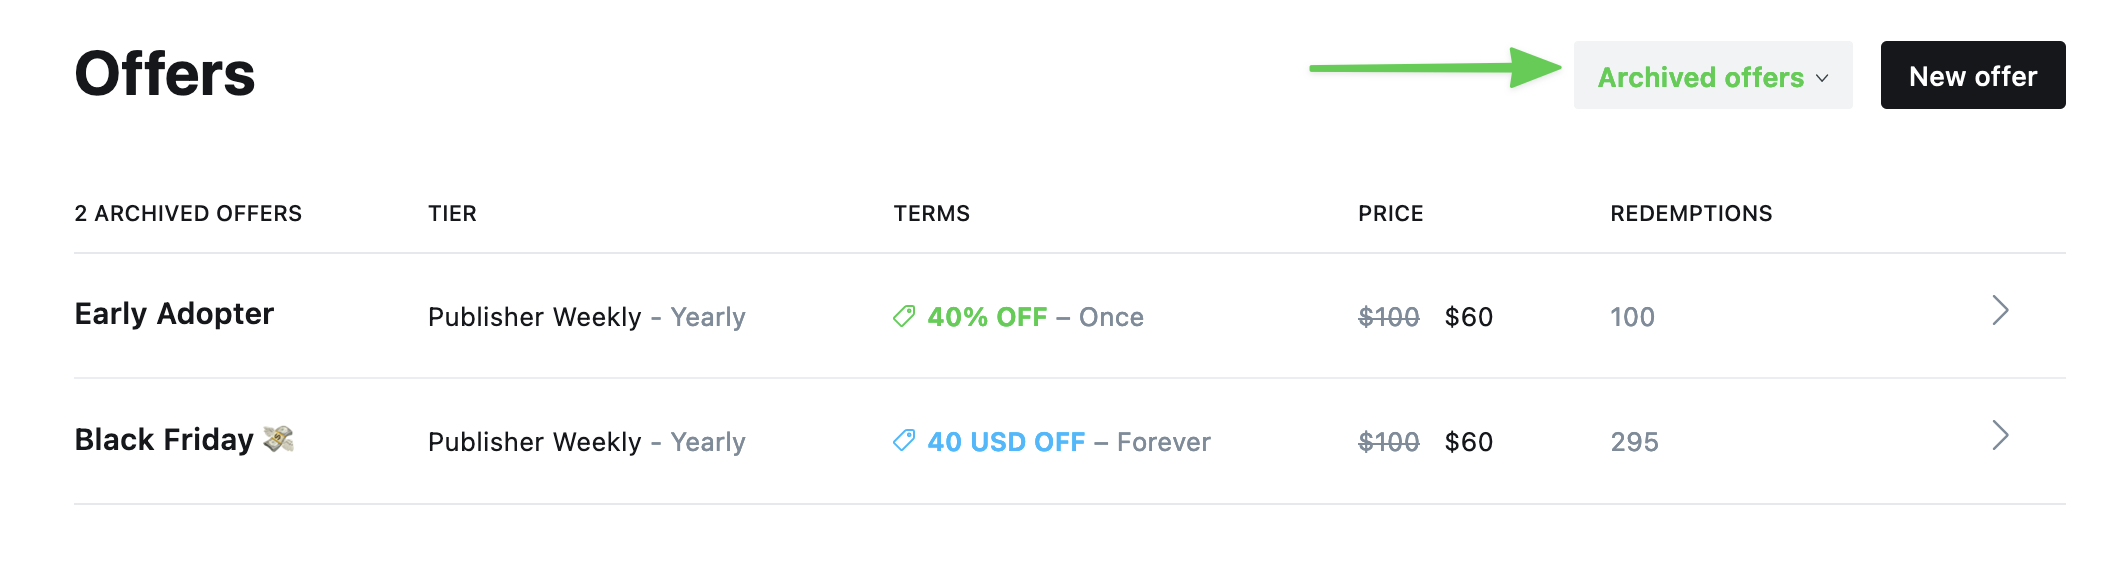
Discover how many times offers have been redeemed from the offers page, or archive page:
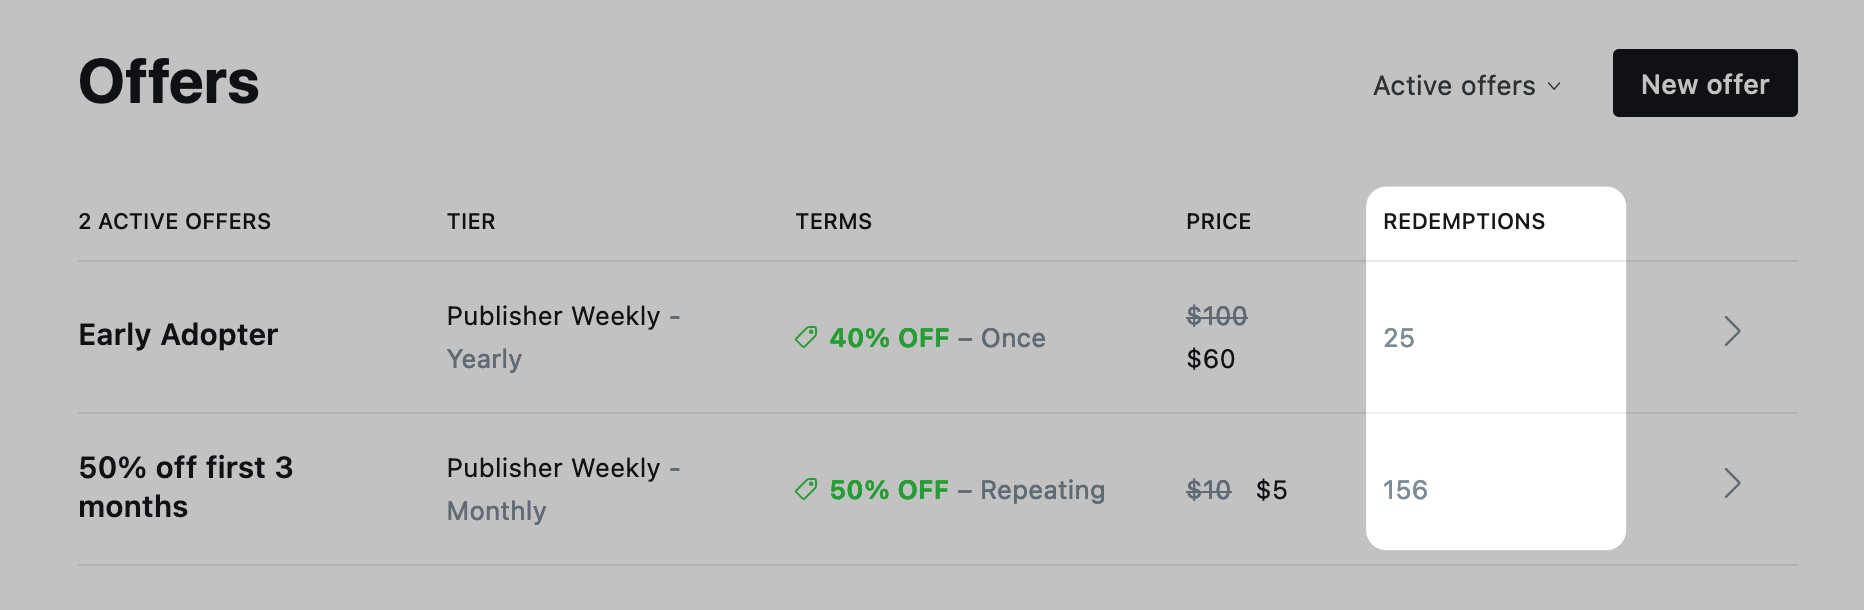
Archiving offers
All offers can be archived and reactivated at any time. Archiving an offer makes sure it is no longer available, and moves the offer to the archived folder.
Further reading
To learn more about discounting strategies, such as how to price your offers and how to balance conversion rates with retention, check out these insightful resources:
David Ramos David Ramos
All of the important technical things like authentication, monitoring and checking blocklists
]]>All of the important technical things like authentication, monitoring and checking blocklists are all things that we manage as part of your service, so you can focus on what's important.
Thousands of creators deliver millions of emails using Ghost(Pro) and we see consistently above average delivery rates.
Spam prevention
It is possible that a very small percentage of emails may end up being marked as spam. This depends on many factors, such as the sending reputation of your from address, the email provider of the recipient (Hotmail and Outlook are notorious for poor spam handling), and the content of your email.
If you want to be proactive, there are some things you can do that may have a positive impact on your delivery rates:
- Run your email newsletter content through a spam checker, to identify language that can trigger spam filters.
- Encourage your members to add your address as a safe sender, or even better, encourage them to reply to your emails.
- Keep your free subscriber list tidy by periodically removing inactive subscribers
Further reading
 Kym Ellis
Once Stripe has been connected to your site and membership tiers are in place, you can customize Portal
]]>Once Stripe has been connected to your site and membership tiers are in place, you can customize Portal to match your brand and style.
Customize Portal settings
To get started, go to Settings → Membership → Customize Portal to customize Portal signup options, as well as the look and feel of the Portal interface. When you update and save Portal settings, your changes go live right away.
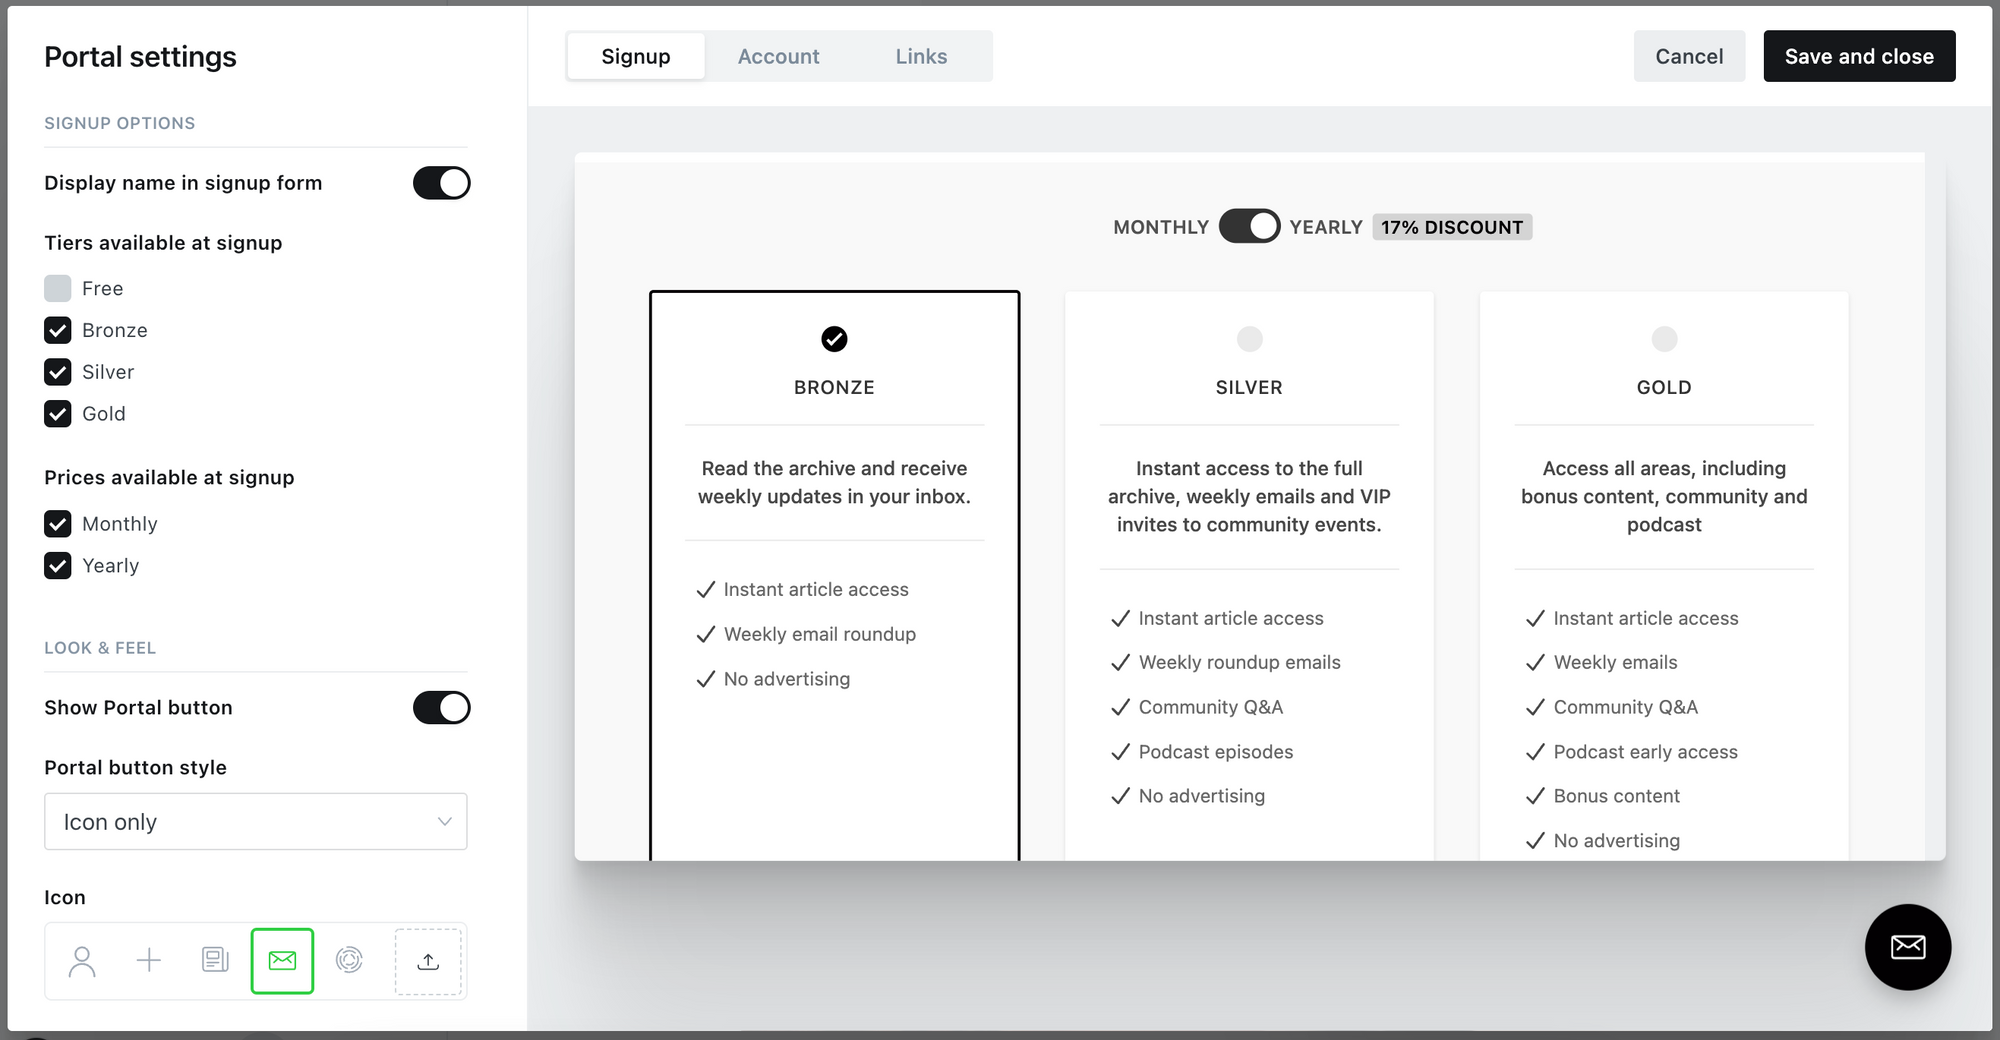
Signup options
Select which plans are available to visitors who want to signup, using any combination of tiers to suit your business. Leave all plans unchecked for an invite-only site, where your visitors have to contact you directly for access.
- Display name in signup form
Toggling this feature on will add a text field in the signup form that allows your members to enter their name in and attach it to their account. - Tiers available at signup
Depending on your subscription model, you can customise which tiers are available to your visitors. You can run a free membership publication where visitors need to subscribe to access protected content or receive newsletters, or you can offer premium subscriptions. It's totally up to you.
Look and feel
Create a Portal that matches your company brand or publication style. You'll see the Portal screens update in real-time as you make changes. Remember to hit the save button when you're finished editing.
- Show Portal button
Shows or hides the Portal button on your publication. Even if the button is hidden, all Portal screens can be accessed using Portal links — more on that below. - Portal button style
Allows you to choose from Icon and text, Icon only, or Text only. - Icon
If your button style includes an icon, this option will be available to you. You can pick from a library of icons or upload a custom icon. It's recommended to use an SVG, PNG, or JPG image no larger than 60px by 60px. - Signup button text
If your button style includes text, this option will be available to you. You can enter any text string.
Account page settings
The Account tab in your Portal settings shows a preview of what the account page will look like for your members. From here, members are able to manage their own account and subscriptions as well as reach out to you for support.
- Support email address
This is where members can reach you for help with their accounts. You must use an email address that can receive messages. Validate and confirm the change by clicking the link sent to the new email address.
Note: This email address is publicly available on your site, within the Portal interface.
Portal links
The Portal links section displays a list of links that you can use to add direct links to your site that open the Portal experience.
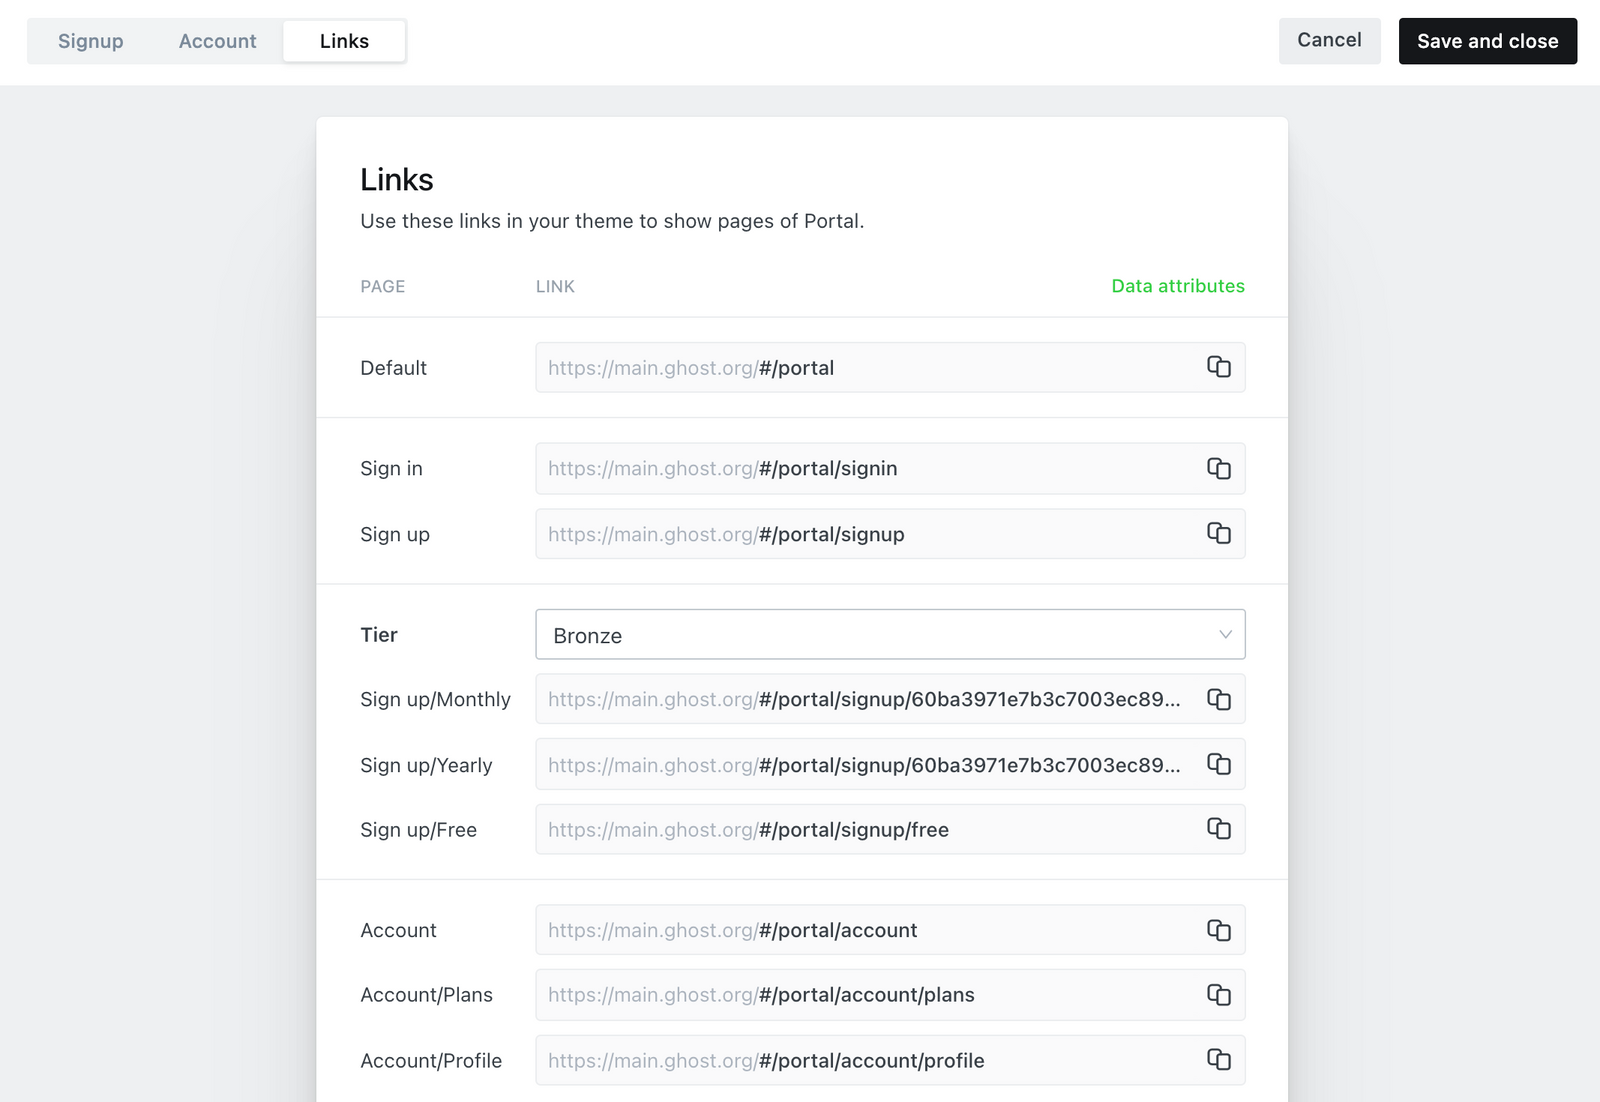
You can use these links in posts and pages. For example, adding a link to https://yoursite.com/#/portal anywhere on your site opens up the Portal window.
You could add this to a text link, turn an image card into a link, or you could add a custom button using an HTML card, like this:
<a href="https://yoursite.com/#/portal"
         style="
  background-color: #f90;
  border: none;
  border-radius: 10px;
  color: white;
  padding: 15px 32px;
  text-align: center;
  text-decoration: none;
  display: inline-block;
  font-size: 16px;
  font-weight: 600;
  width: 80%;
  ">
     Your Text Goes here
</a>
Advanced setup
It's possible to hide the default Portal button and access specific Portal screens via URLs or data attributes in your theme. Read more about Portal links in the developer docs.
]]>A tiered pricing strategy makes it possible to grow your business by offering different products and benefits to your audience.
Create your custom tiers
If you have Stripe connected, tiers can be created
]]>A tiered pricing strategy makes it possible to grow your business by offering different products and benefits to your audience.
Create your custom tiers
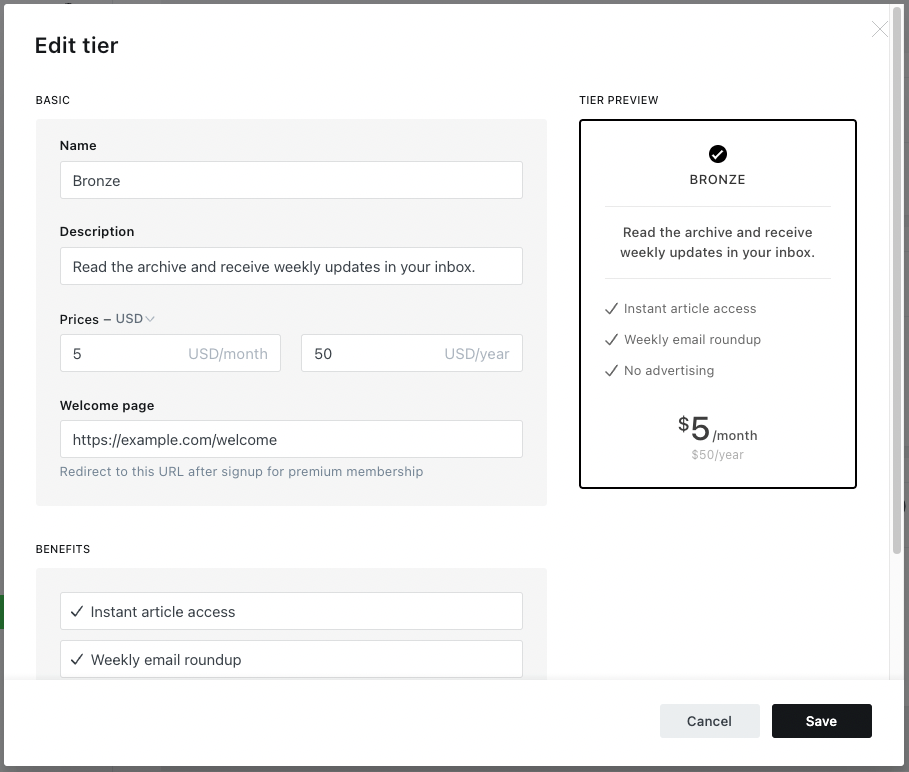
If you have Stripe connected, tiers can be created from the Settings → Memberships area in Ghost Admin.
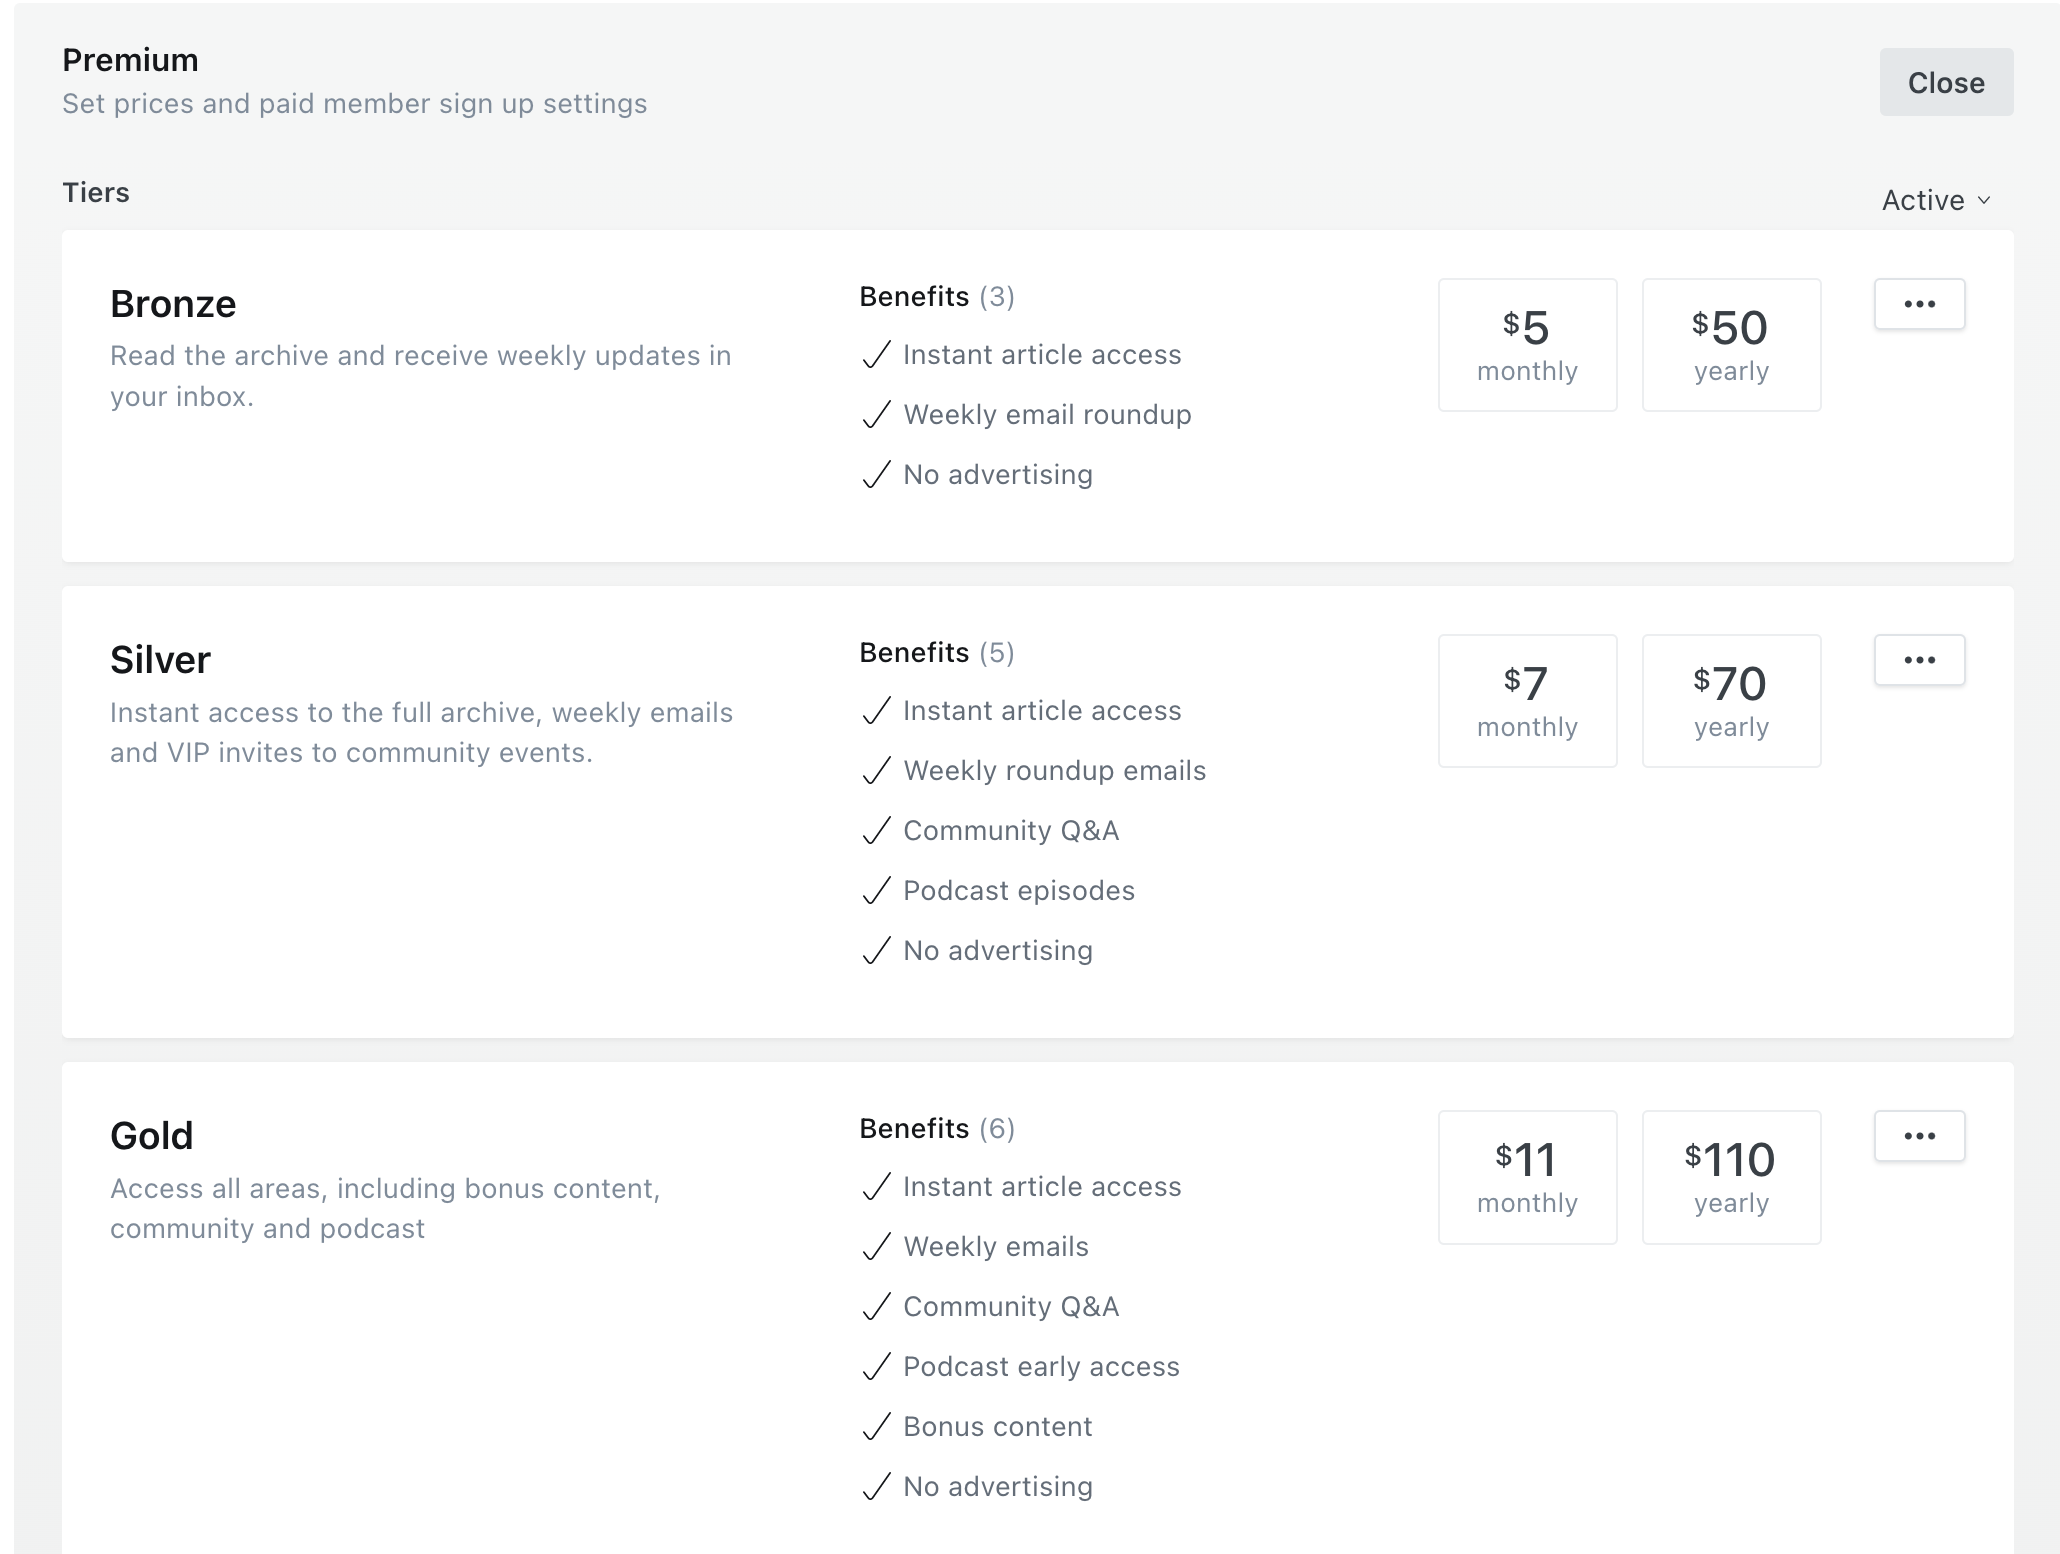
Each paid tier can have its own name, description, monthly and yearly prices, and list of benefits.
Making tiers available to visitors
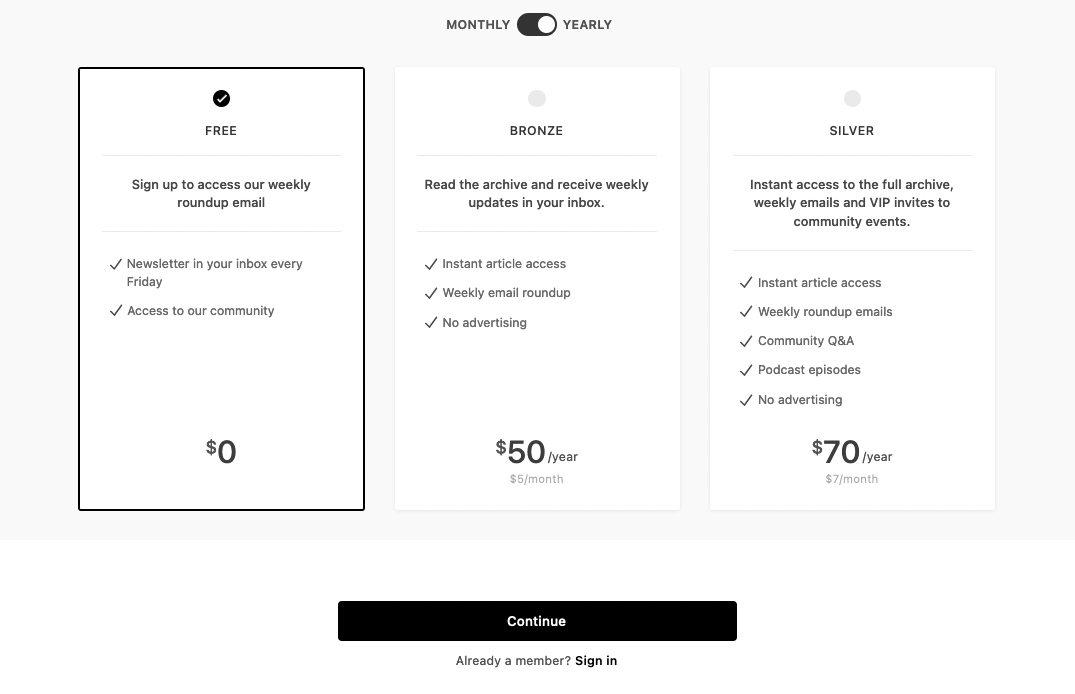
The quickest way to make your new tiers available to visitors of your website is to use Portal. To access your Portal Settings, go to Settings → Memberships → Customize Portal.
From the Portal Settings, you can control which tiers appear on your site at a granular level, including available prices — monthly, yearly, or both.
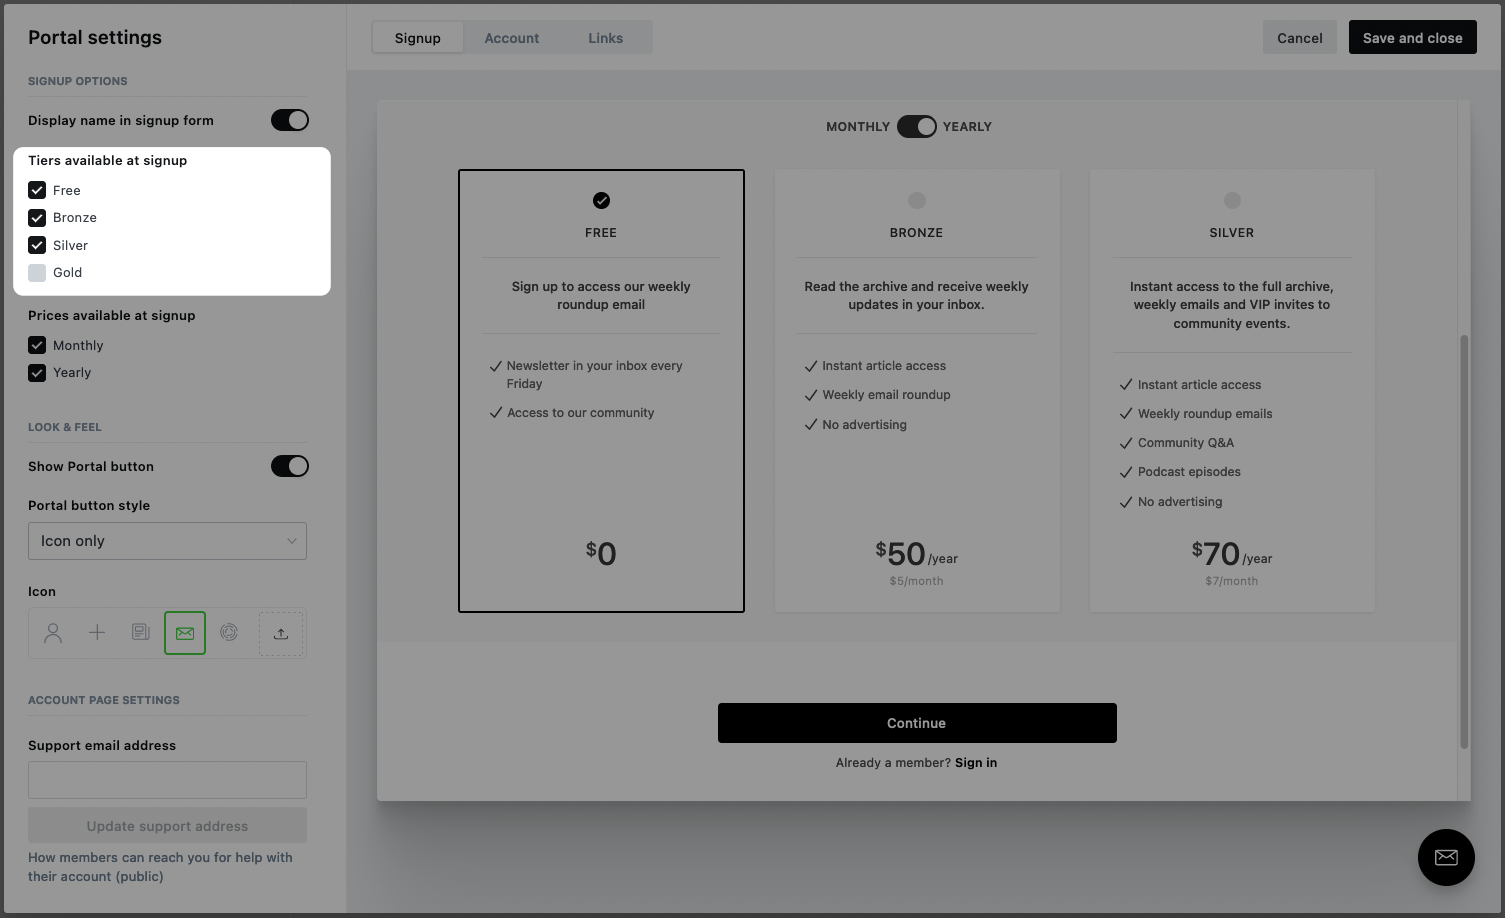
Once you're happy, click Save and close to publish the tiers on your site within the Portal experience.
The Links section of the Portal settings area shows links for each available tier. These links can be used on social media, in emails, and anywhere else you might want to share your sign-up form directly.
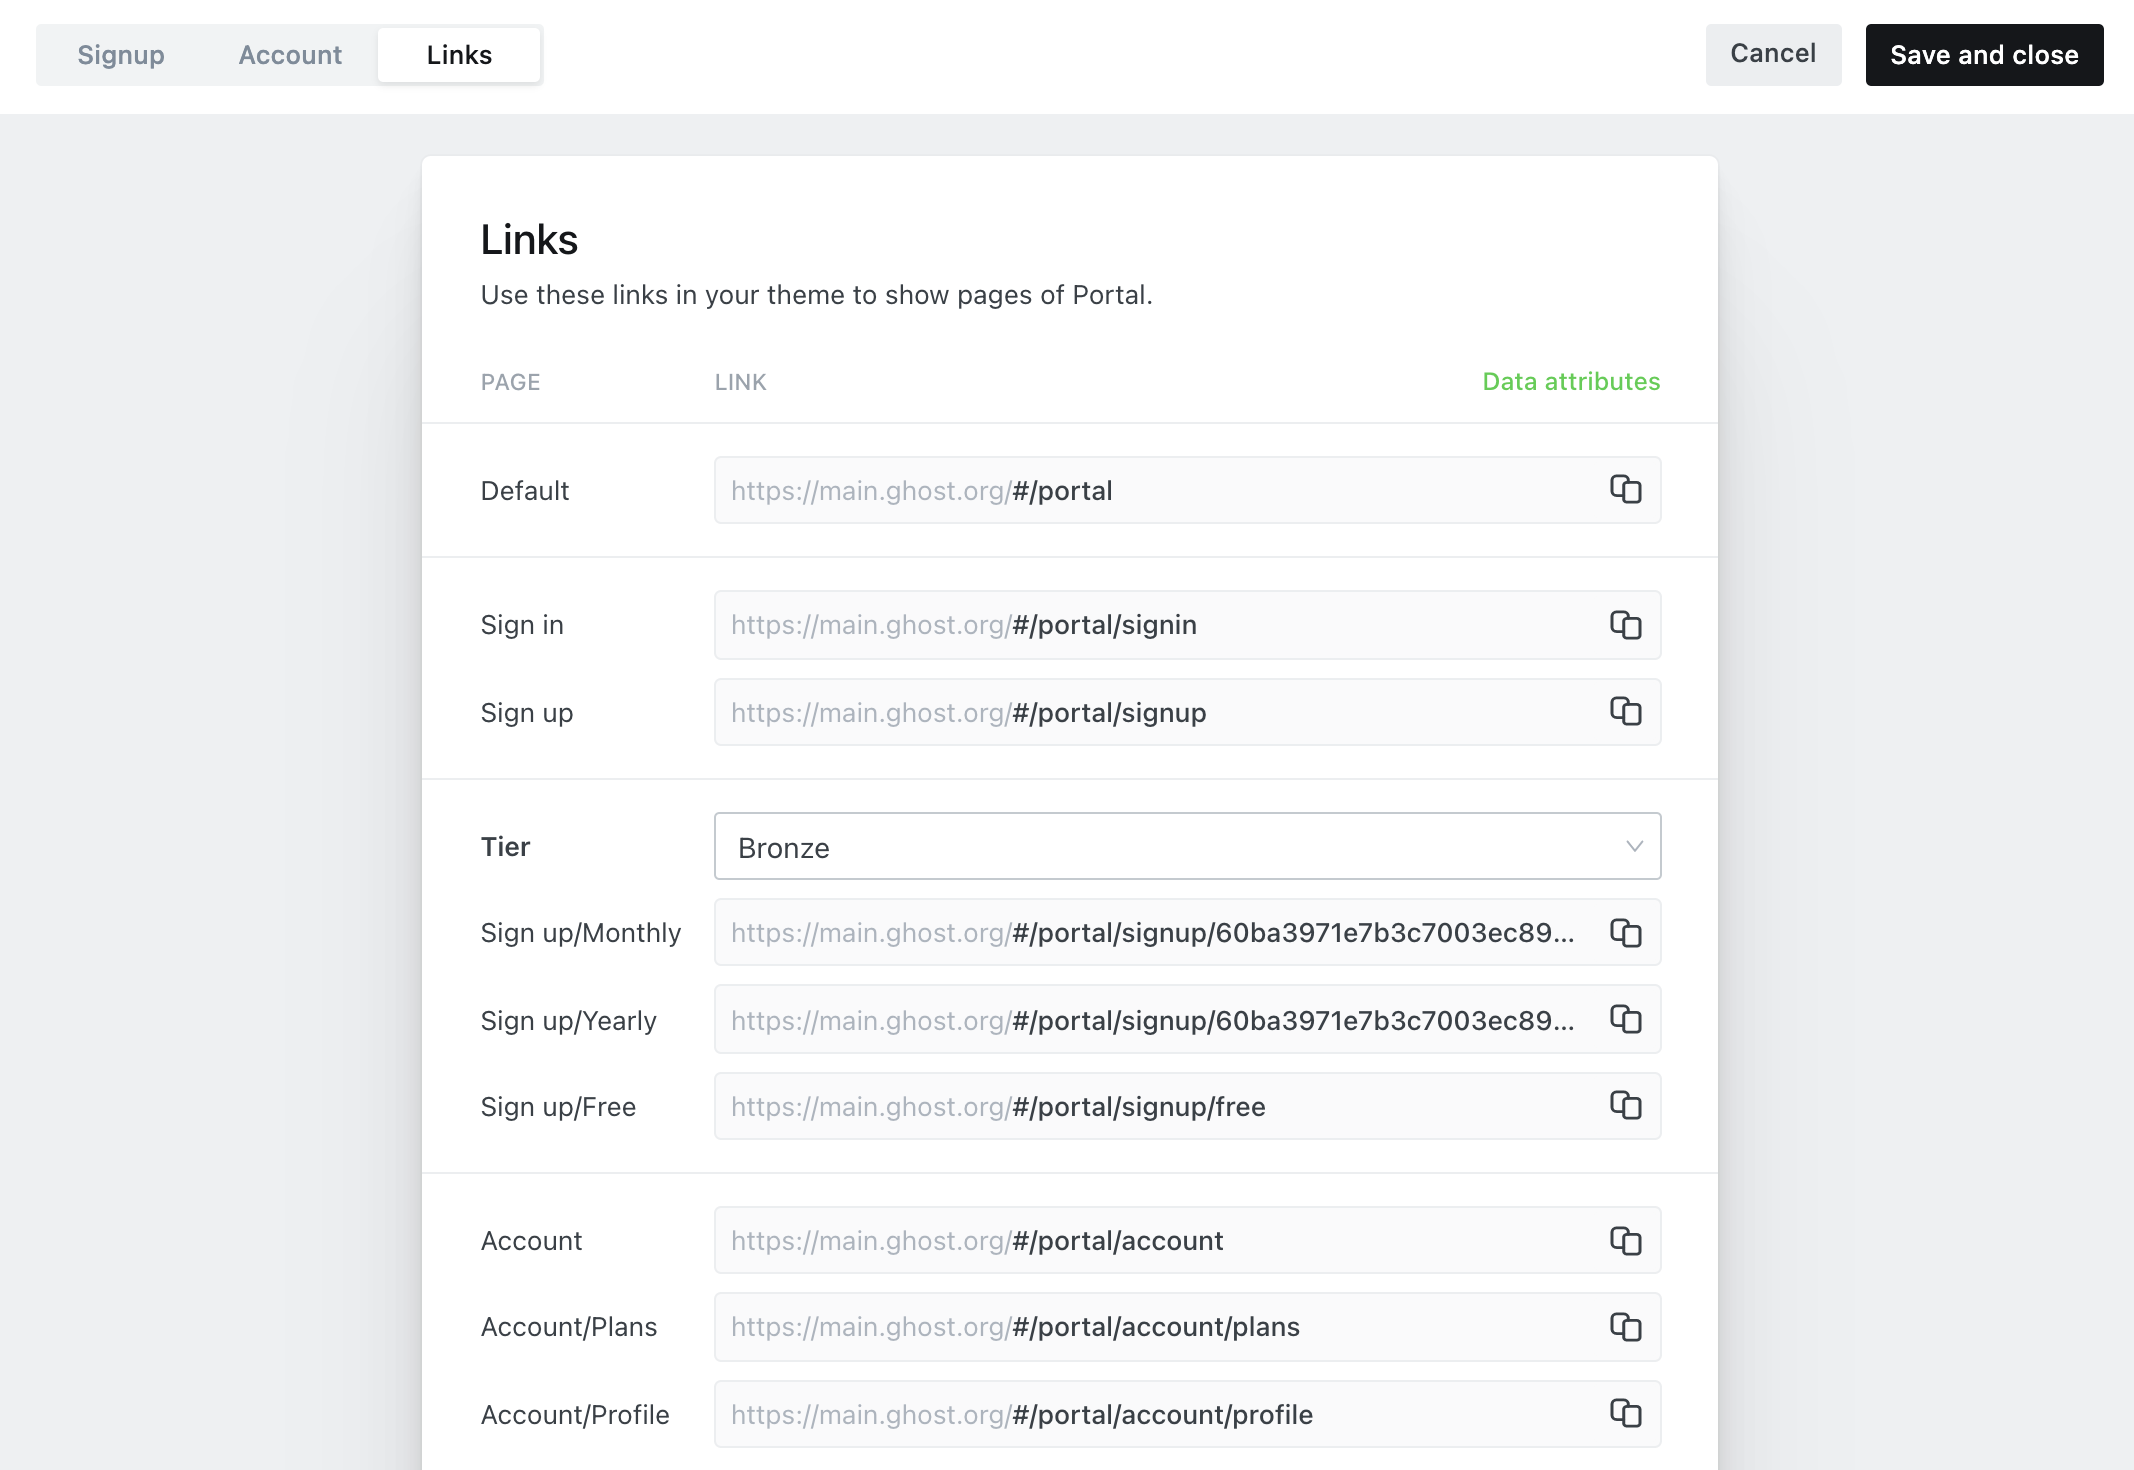
Tip 💡 You can also use these links for campaigns or to send directly to people, without featuring the tier on your site.
Archiving tiers
Archiving tiers allows you to make any tier unavailable when no longer needed, removing the ability to promote the tier using Portal. It’s possible to unarchive a tier any time if you need it back.
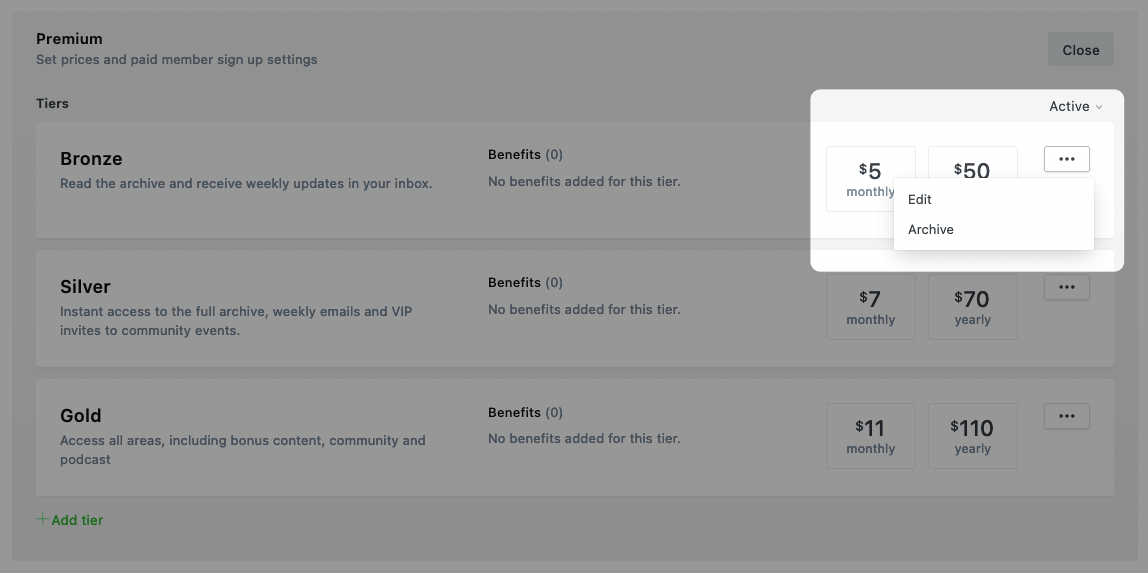
Members who have subscribed to a tier that’s been archived remain subscribed and will continue to renew. You can still send content to members subscribed to an archived tier.
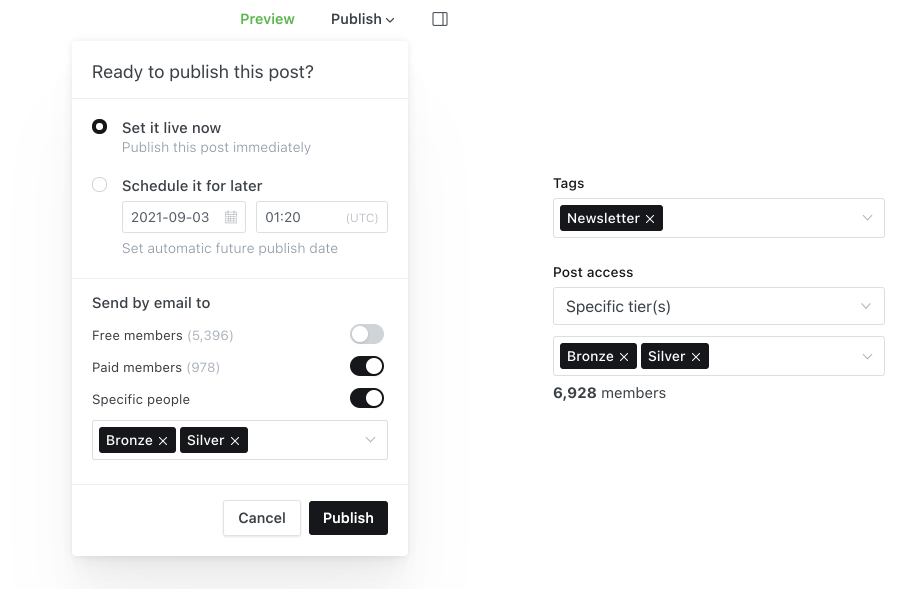
Publishing for specific tiers
When publishing, you can control access to your content and newsletters by selecting specific tiers. This gives you full control over the content that each tier has access to. Read more about sending email newsletters to your audience.
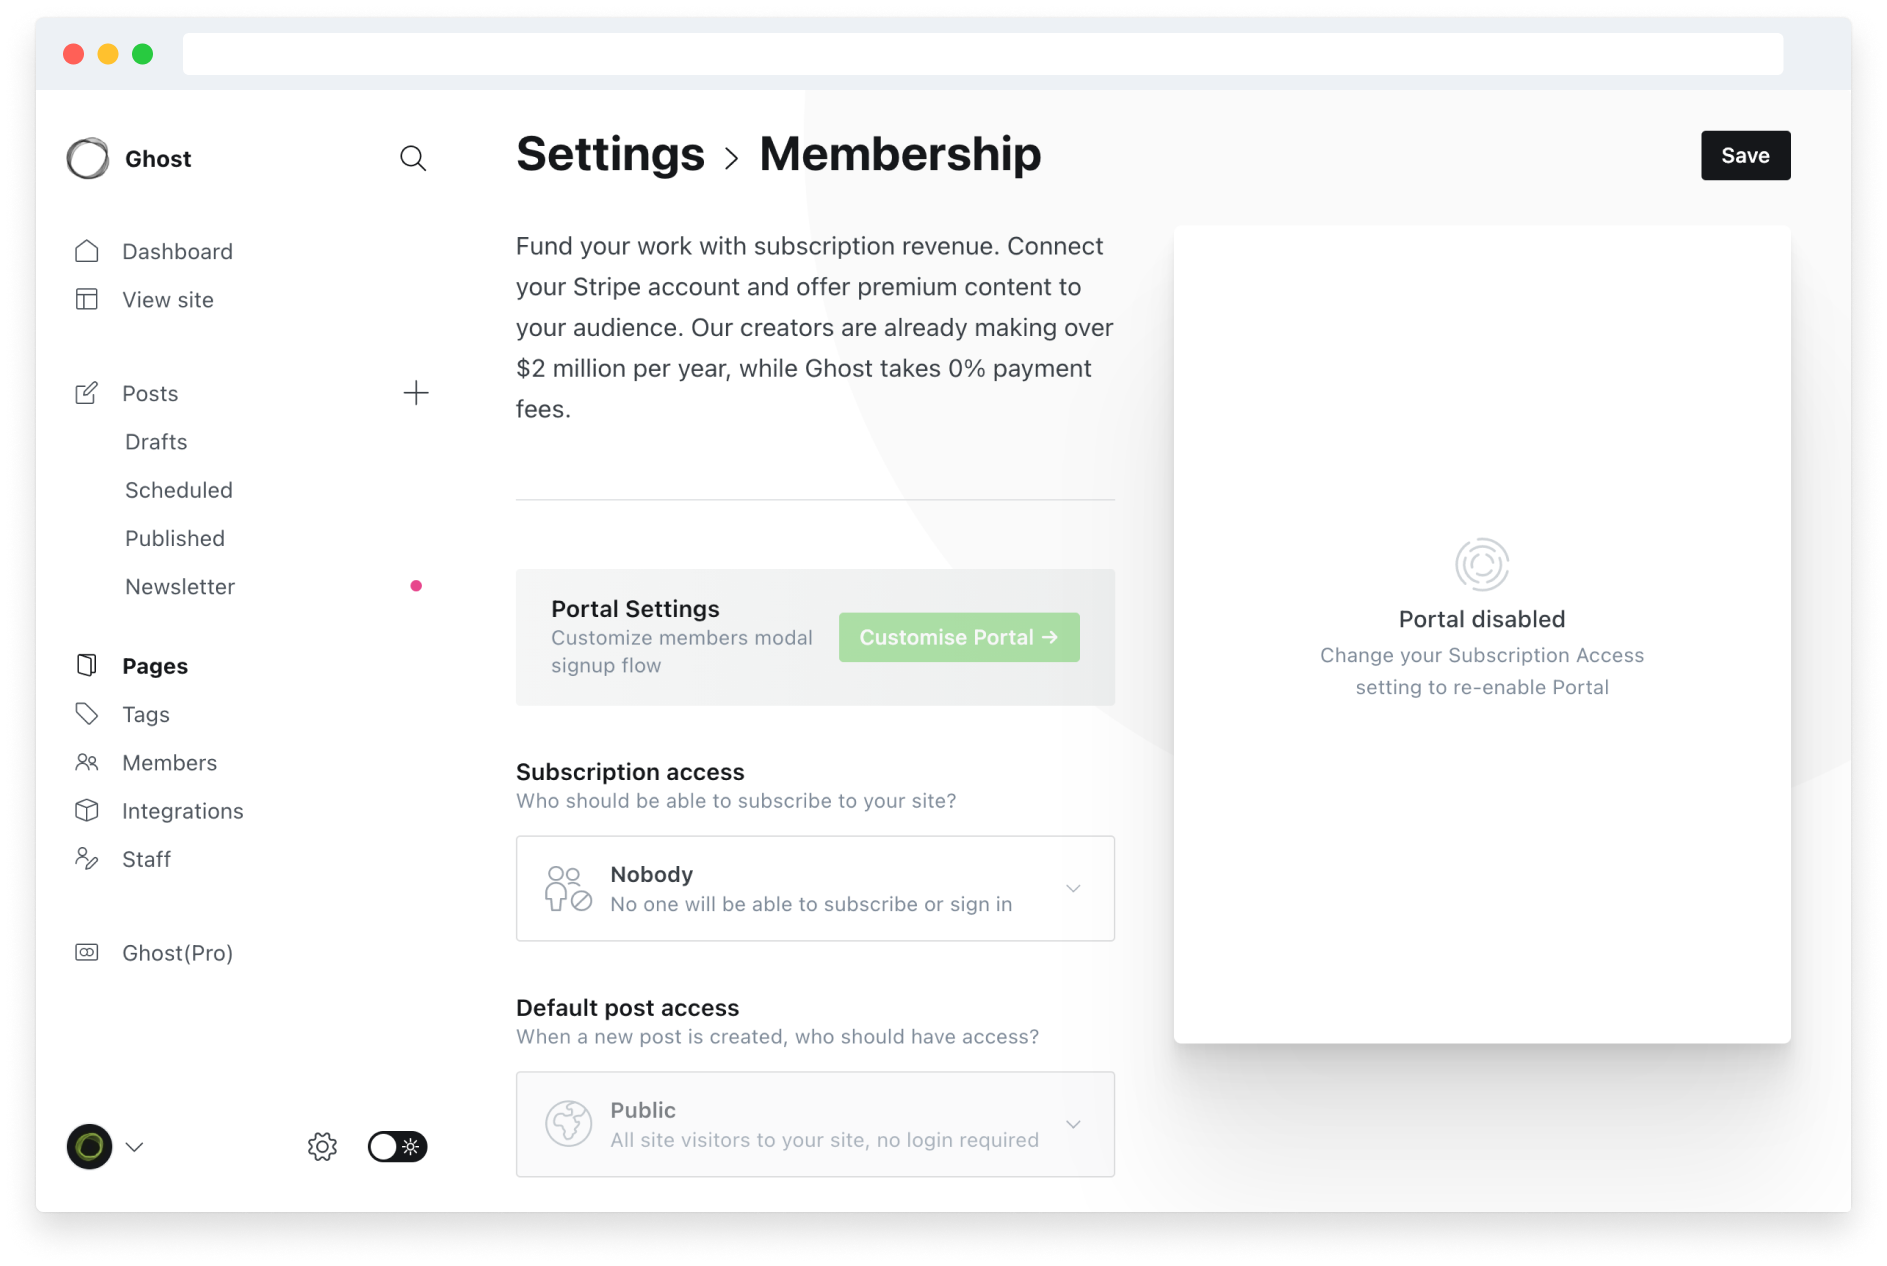
Head to Settings → Membership and change the
]]>Head to Settings → Membership and change the subscription access level to Nobody. This will disable Portal and prevent any visitors from being able to subscribe or sign in to your site.
The reason for this is because modern email clients automatically disable embeds for security, including iFrames and any type
]]>The reason for this is because modern email clients automatically disable embeds for security, including iFrames and any type of embed that uses JavaScript.
Since this is a limitation that is entirely controlled by external email clients, there is no way to make a dynamic embed work in an email. However, there is a workaround which some people use to share dynamic content in email newsletters:
- Take a screenshot of the embed
- Insert the screenshot as an image in the post
- Use the link feature to turn the image into a link, that opens your embed in a new tab
- Deliver the email newsletter to your members
- Once the post is published and delivered, you can optionally swap the screenshot for a real embed, which will be available for any visitors to that post on your website.
By default, Ghost automatically renders embeds for YouTube and Vimeo in your email newsletters so that readers are able to click on them and open the video as a link.
]]>All Ghost(Pro) servers are located in Amsterdam, The Netherlands. We have a publicly available Data Processing Agreement.
The site is staffed 24/7/365 with onsite security and to protect against unauthorized entry. Each site has security cameras that monitor both the facility premises as well as each area of the datacenter internally. There are biometric readers for access as well as at least two factor authentication to gain access to the building. Each facility is unmarked so as not to draw any additional attention from the outside and adheres to strict local government standards.
If you believe that you have a found a vulnerability in any of our services, please reach out to us directly on [email protected].
]]>